Registration in the system
Main roles in the system: Buyer (key role, maximum rights in the system, sees all information) and Supplier (limited functionality, works with their own orders).
Getting Started
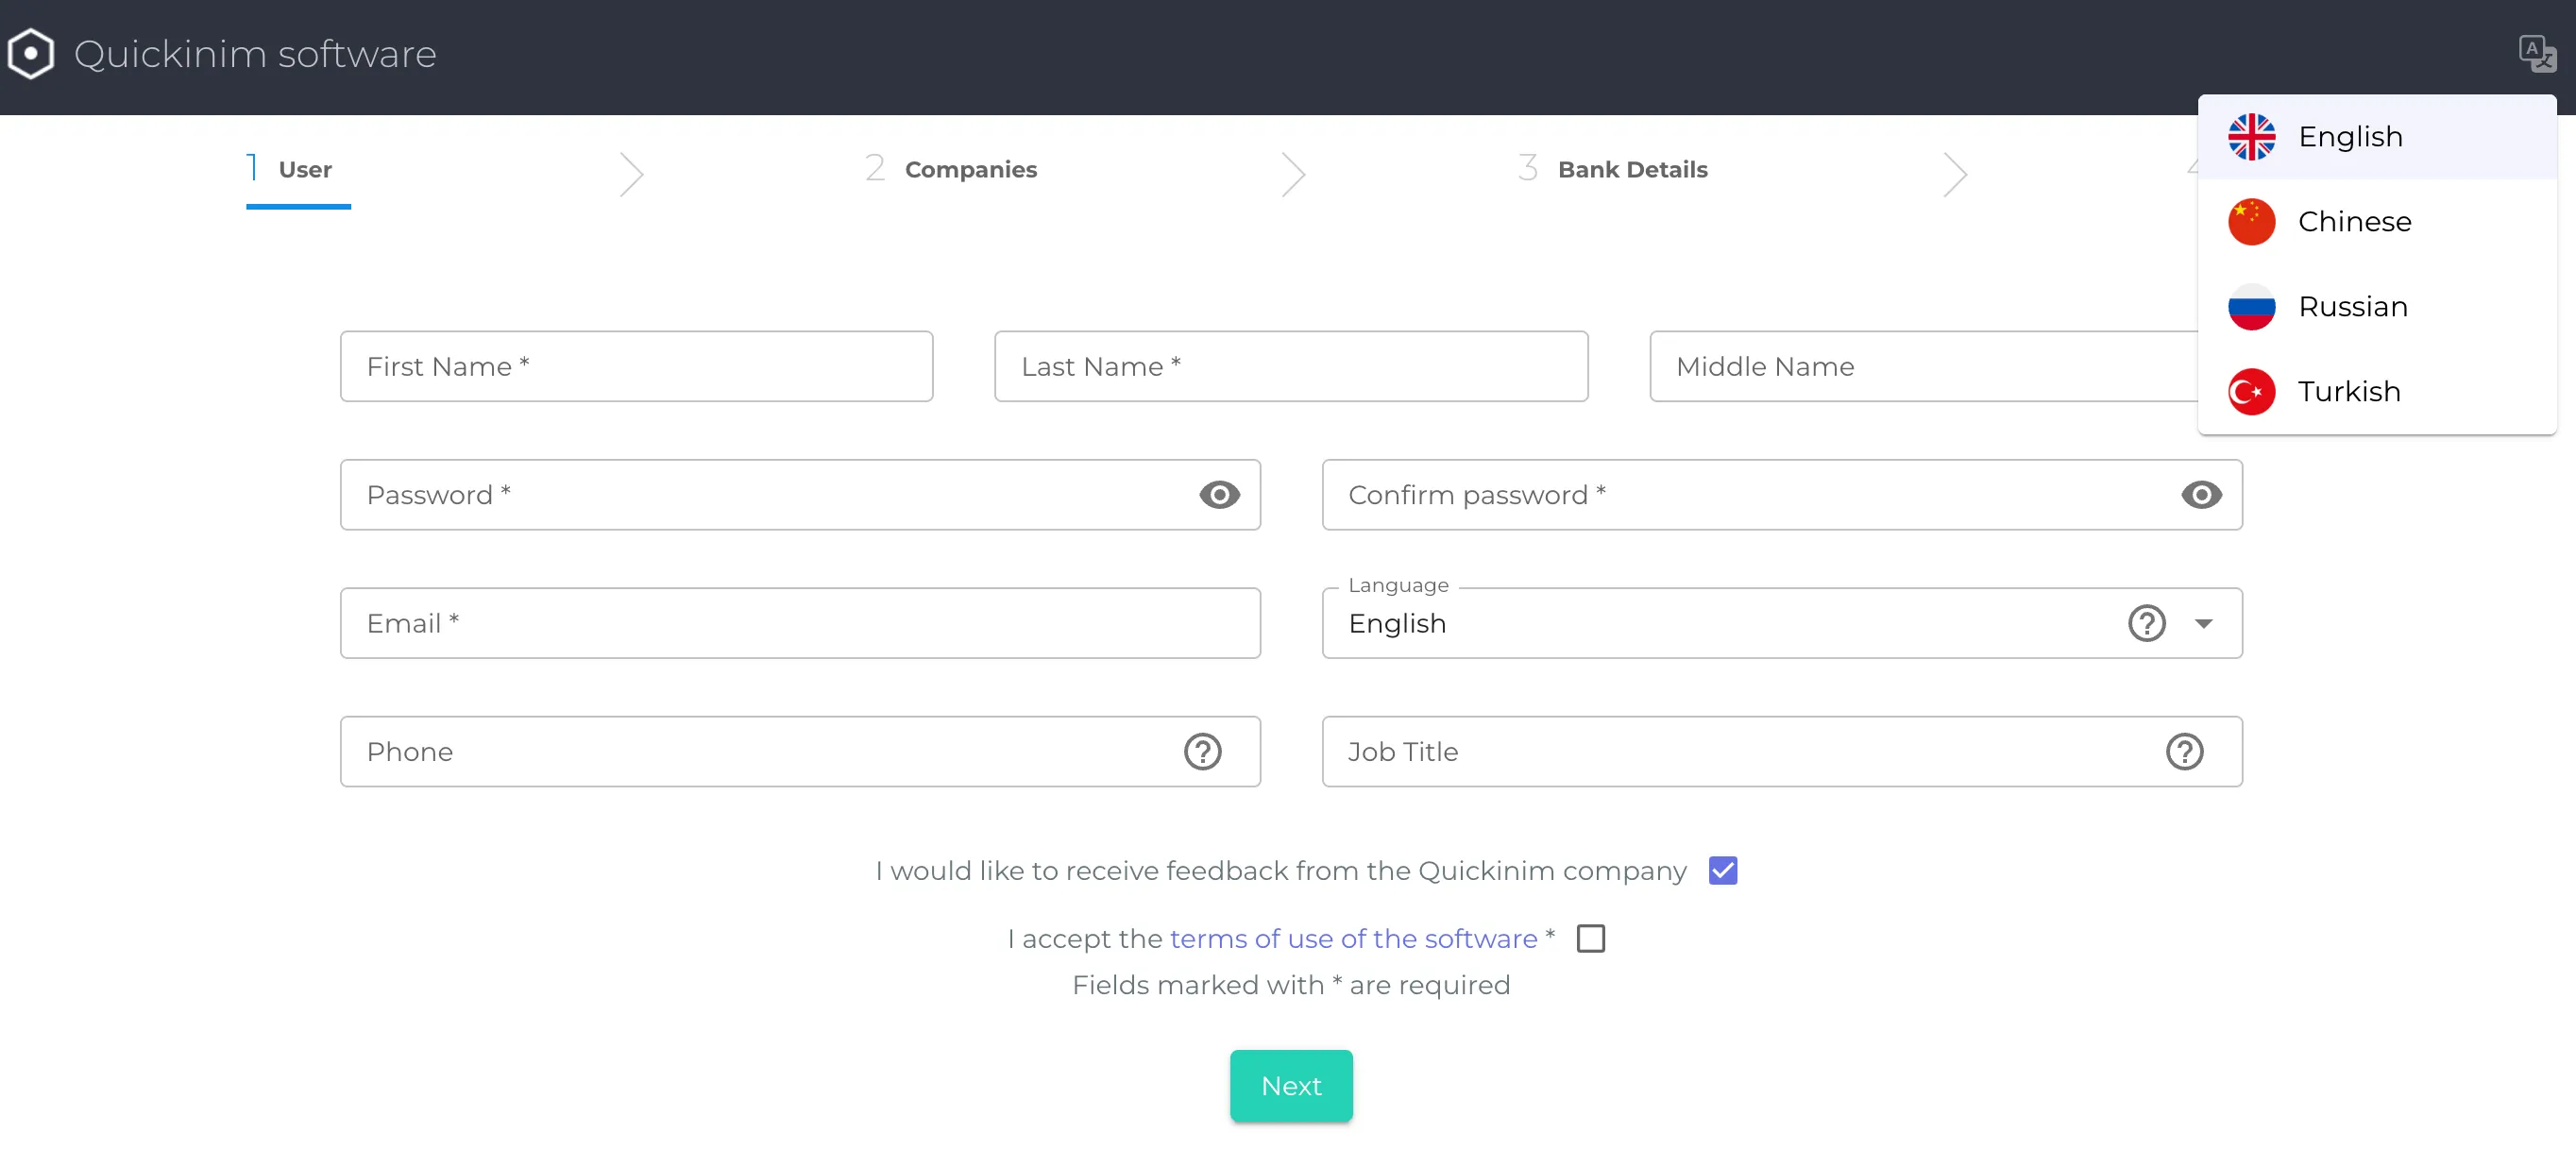
It all starts with registration in the system. The buyer fills in the main sections of the system:
- User information. Contains fields for full name (required), password creation (required), email (required), interface language selection (English, Chinese, Russian, Turkish available), Phone number (this field is not mandatory, but if filled in, the phone number will be indicated in the signature on documents and in orders to Suppliers, so that the Supplier can contact you), and Position in the company.
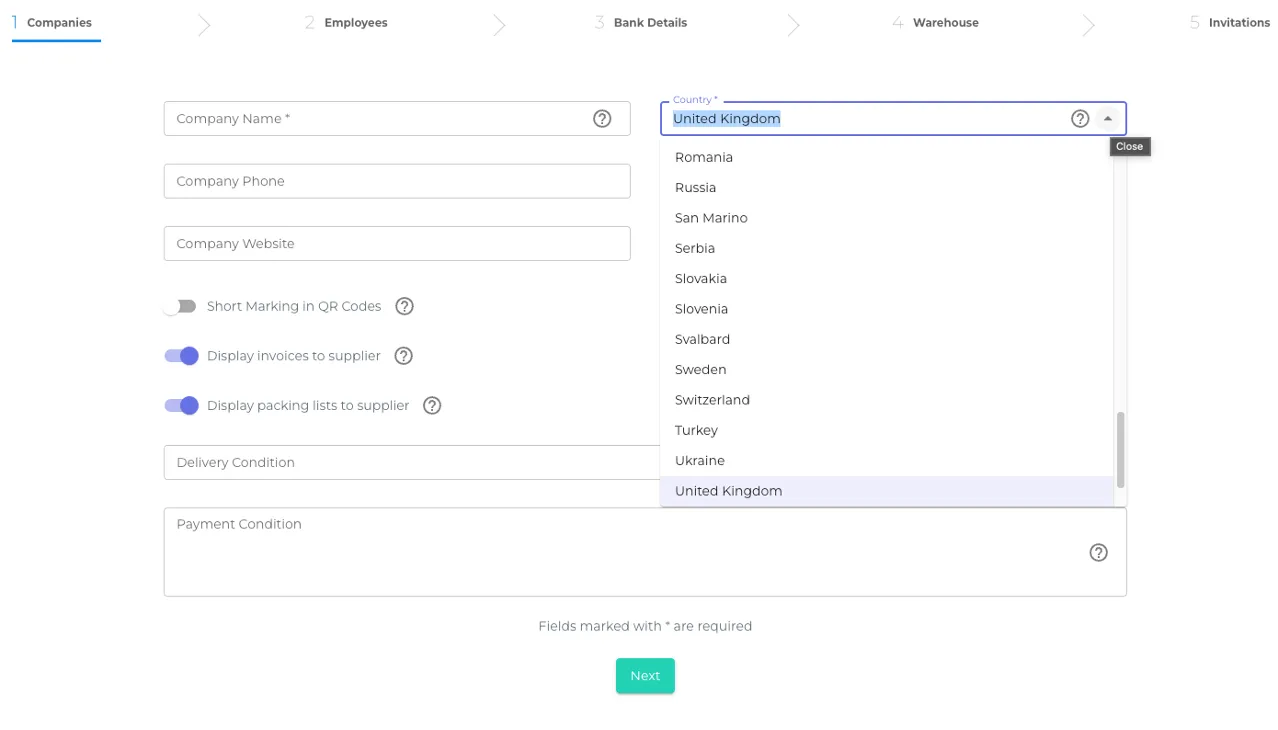
On the same page, there is a checkbox "I would like to receive feedback from Quickinim" and a field "I accept the terms of use of the software" (required, part of the User Agreement). - Company information. Contains the fields Company name (required), Country (select the country of registration of the Company, the field is required), Company phone number, Company address, Company website, Company tax number (the field is not required, but if you fill it in, the Company's national tax number will be indicated in the signature on documents and orders to Suppliers).
- Bank details. Adding a bank account for the company is optional, but filling in the details will allow you to immediately indicate the organization's bank details on printed order forms, to which you can issue an invoice. Contains fields: Currency (drop-down list from Euro, US Dollar, Polish Zloty, Russian Ruble, Belarusian Ruble, Kazakhstani Tenge, Turkish Lira, Kyrgyz Som, Chinese Yuan), Bank Country (drop-down list with a large number of countries), Bank name, Settlement account (text field with comment: Your bank account number; if specified, your account number will be indicated in the signature on documents and in orders to suppliers), SWIFT/Bank indicator (text field), Additional information.
- Warehouse. Fields: Warehouse name (text field), Warehouse address (text field). Note for the user in this block: "The warehouse is the address where your company receives orders delivered by suppliers. When you enter one of the fields, the second field is required. This step is not mandatory; you can create warehouses later."
When you click the Finish button, the Quickinim main page will open with the newly created buyer user profile.
.webp)
Adding suppliers
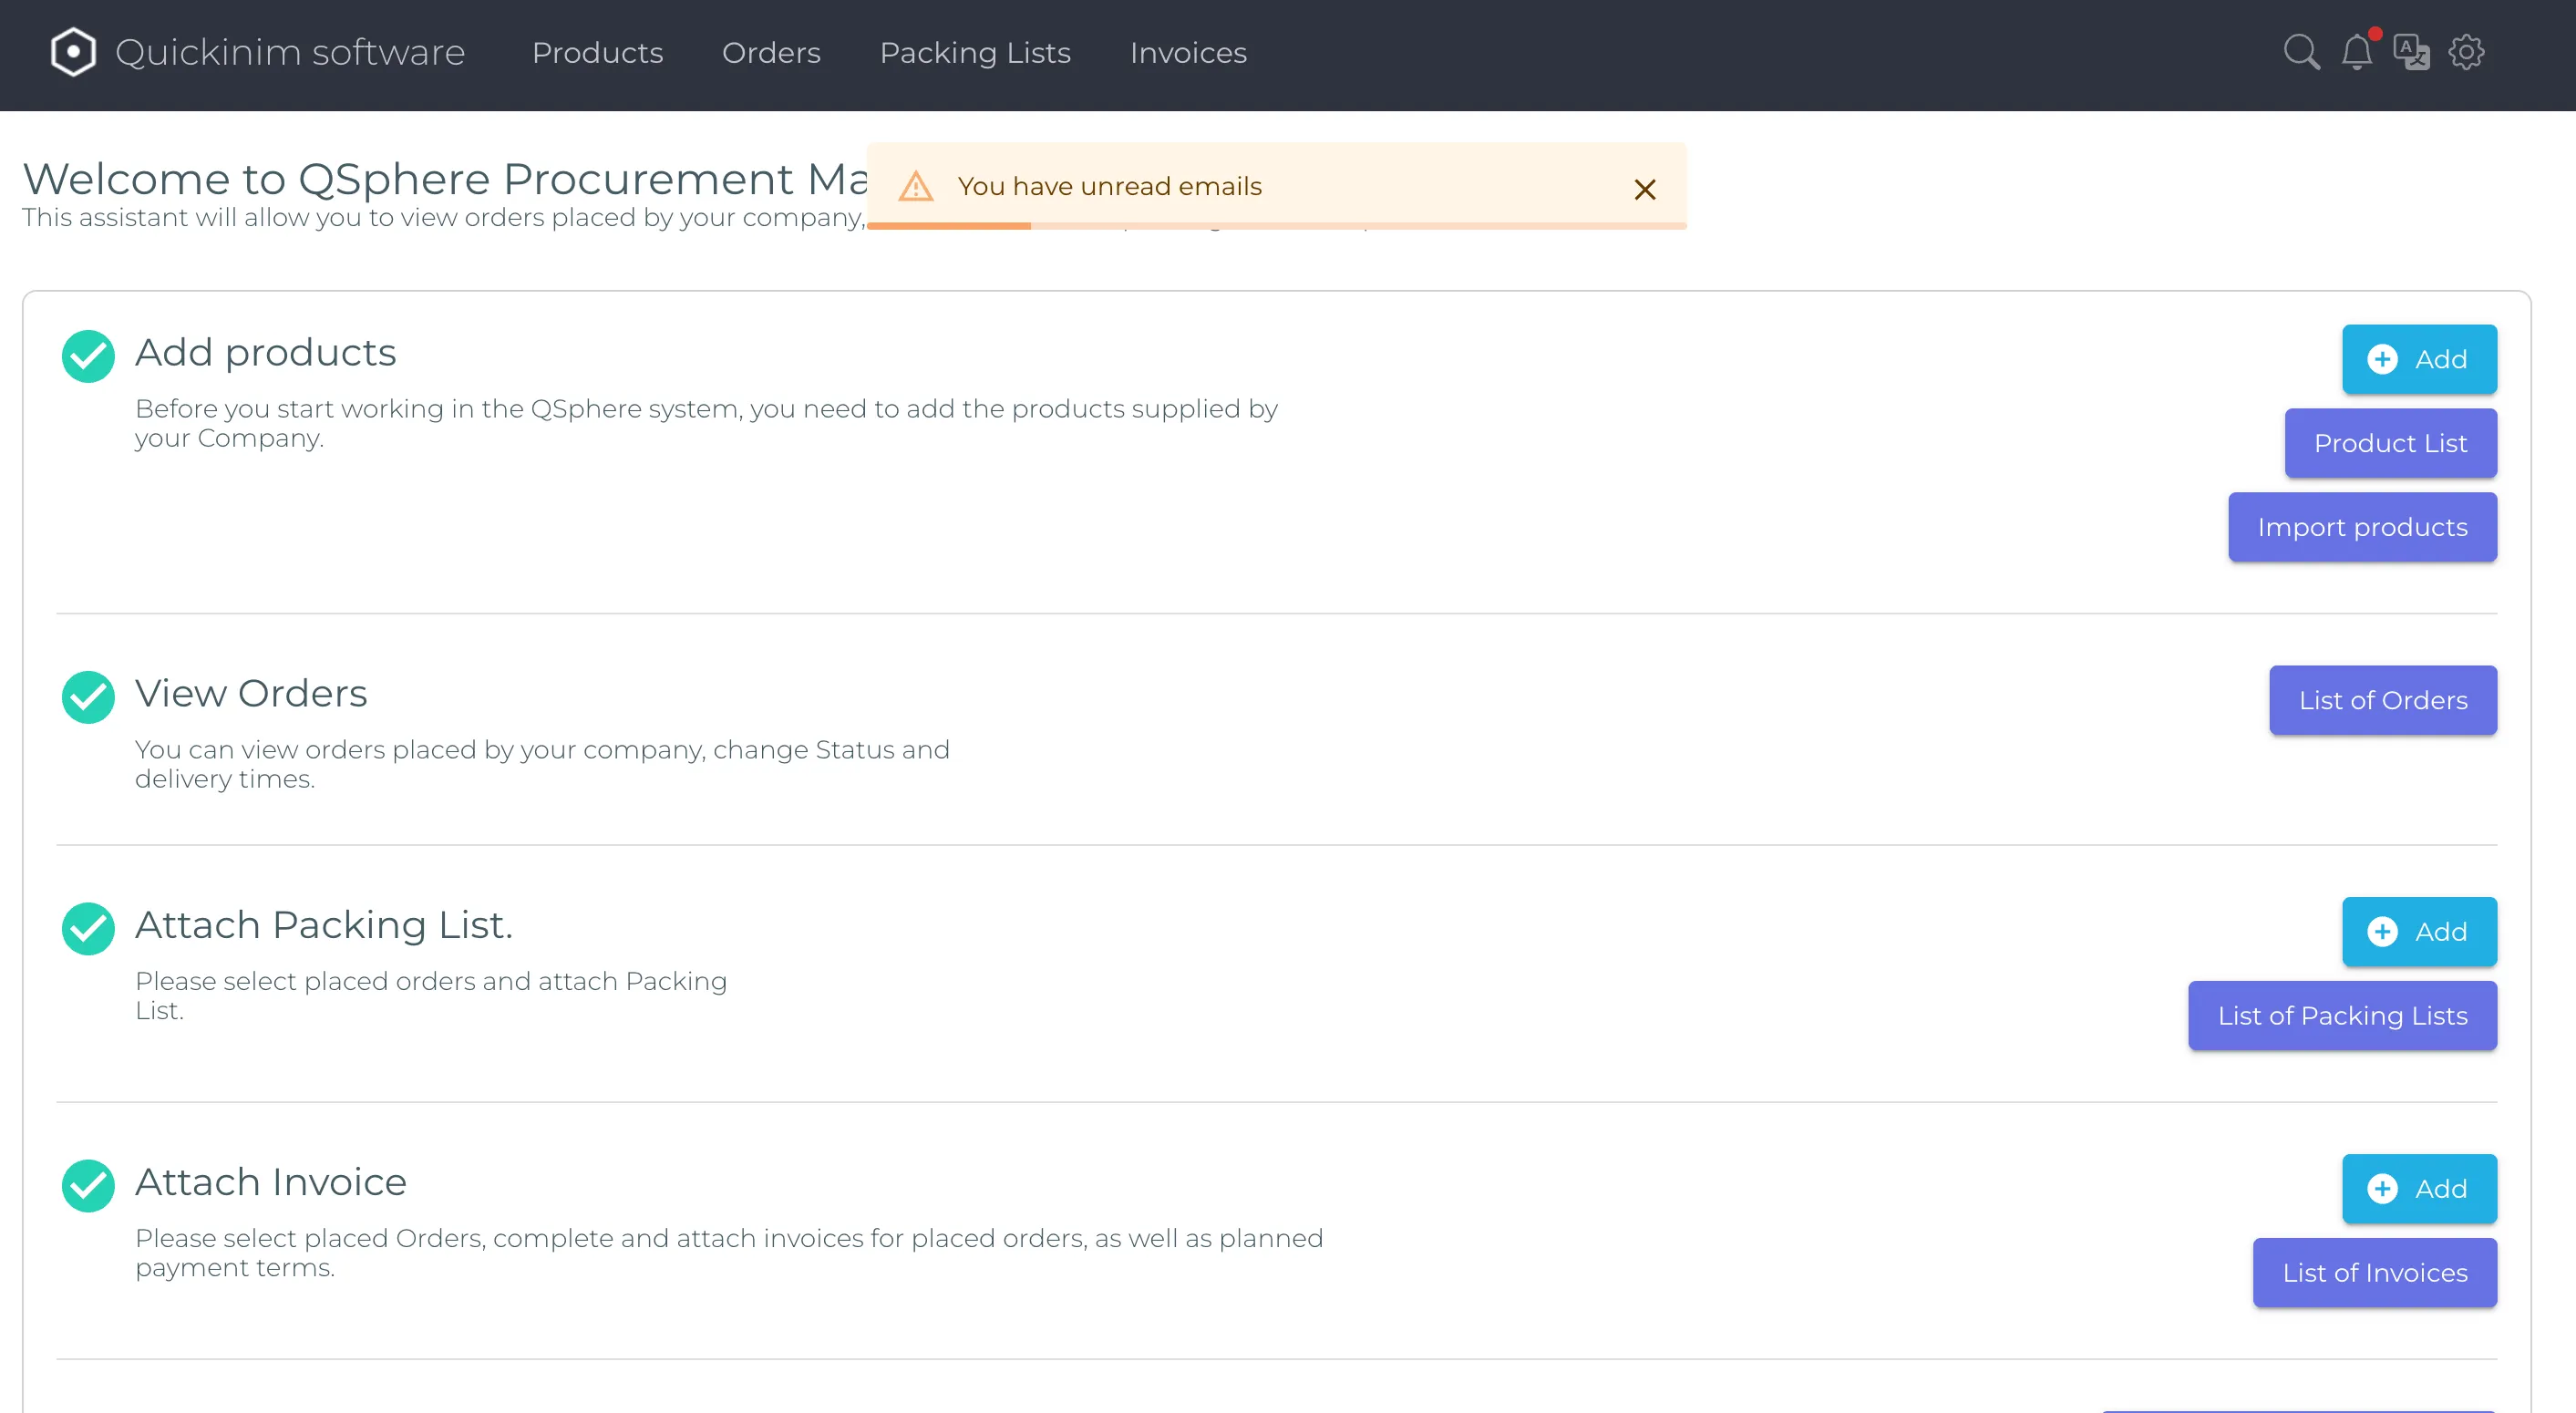
After registration, the user is directed to the main page with the following options:
Add your suppliers to the Quickinim system
Information window for users: "You must add your suppliers to the Quickinim system before you start working. Each supplier has a set of goods that they supply to your company. Once you have added your suppliers and goods, you can place an order with the supplier."
Suppliers can be added in the following ways:
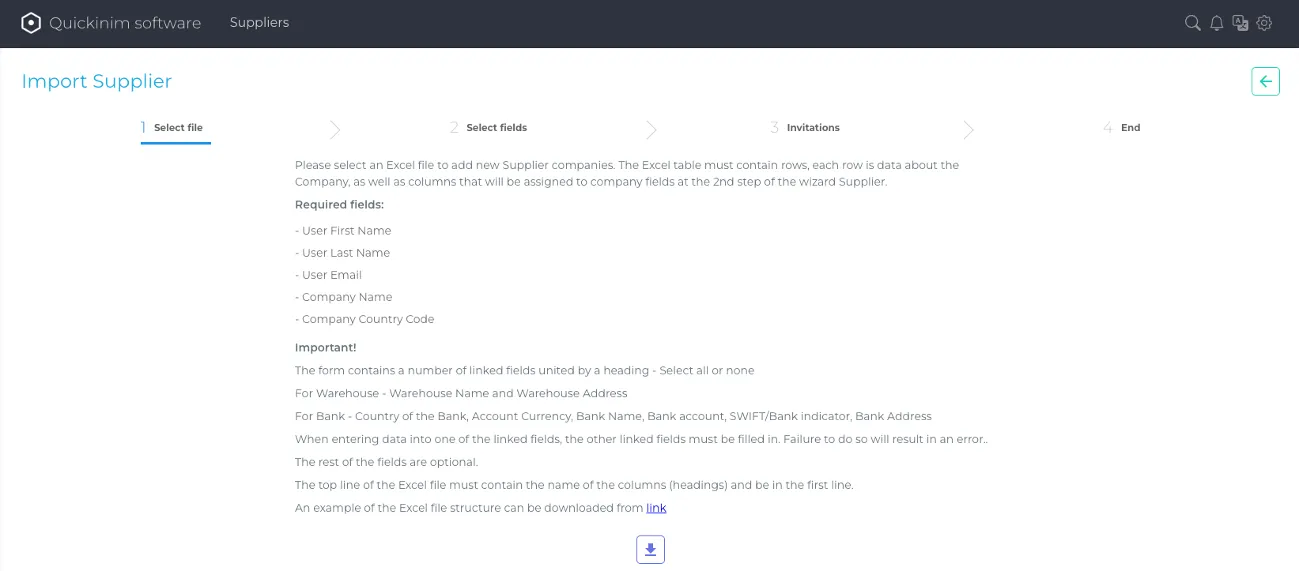
Import the supplier company via an Excel file
Note for the user in this block: "Please select an Excel file to add new supplier companies. The Excel table must contain rows, each row containing data about the company, as well as columns that will be assigned to the supplier company fields in step 2 of the wizard.
Required fields:
- User name
- User surname
- User email
- Company name
- Company country code
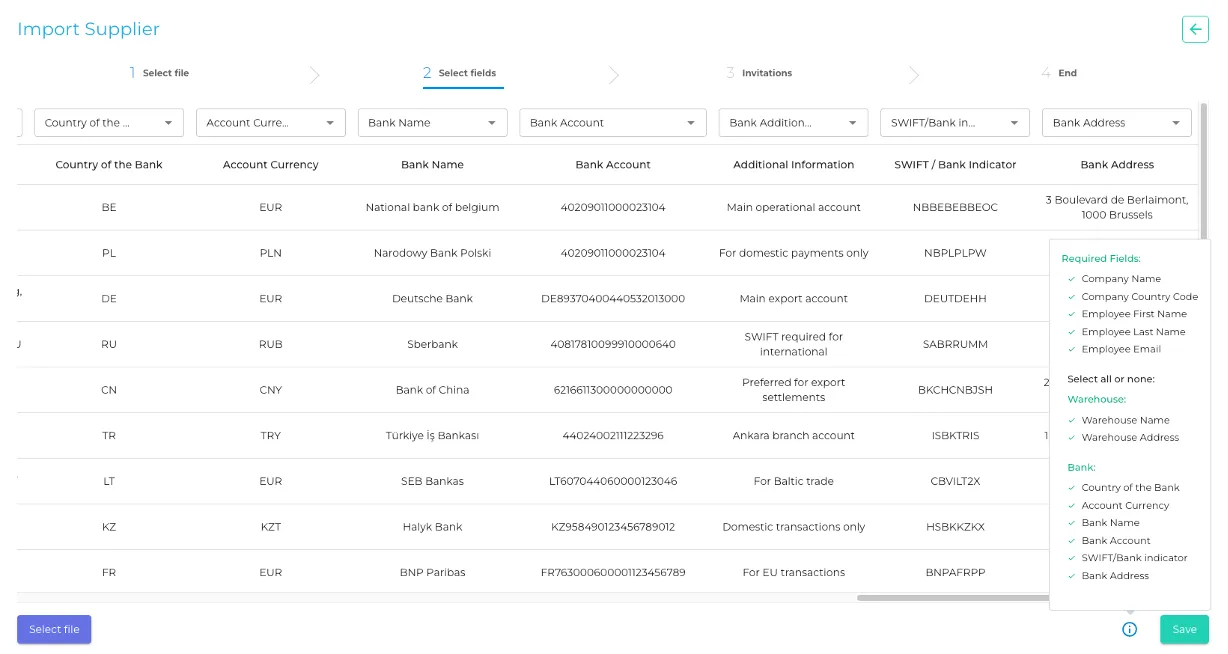
Important! The form contains a number of related fields grouped under the heading "Select all or none."
- For a warehouse - Warehouse name and Warehouse address
- For a bank - Bank country, Account currency, Bank name, Settlement account, SWIFT/Bank indicator, Bank address
When entering data in one of the related fields, the other related fields must be filled in. Failure to do so will result in an error. The remaining fields are optional. The top row of the Excel file must contain column names (headings) and be located in the first row. An example of the Excel file structure can be downloaded from the link.
Next, the user is prompted to download an Excel template file to fill out and upload to the system.
- After selecting the completed file and uploading it to the UI, a page opens with the mapping of the fields filled in from the file and the fields in the system (supplier card).
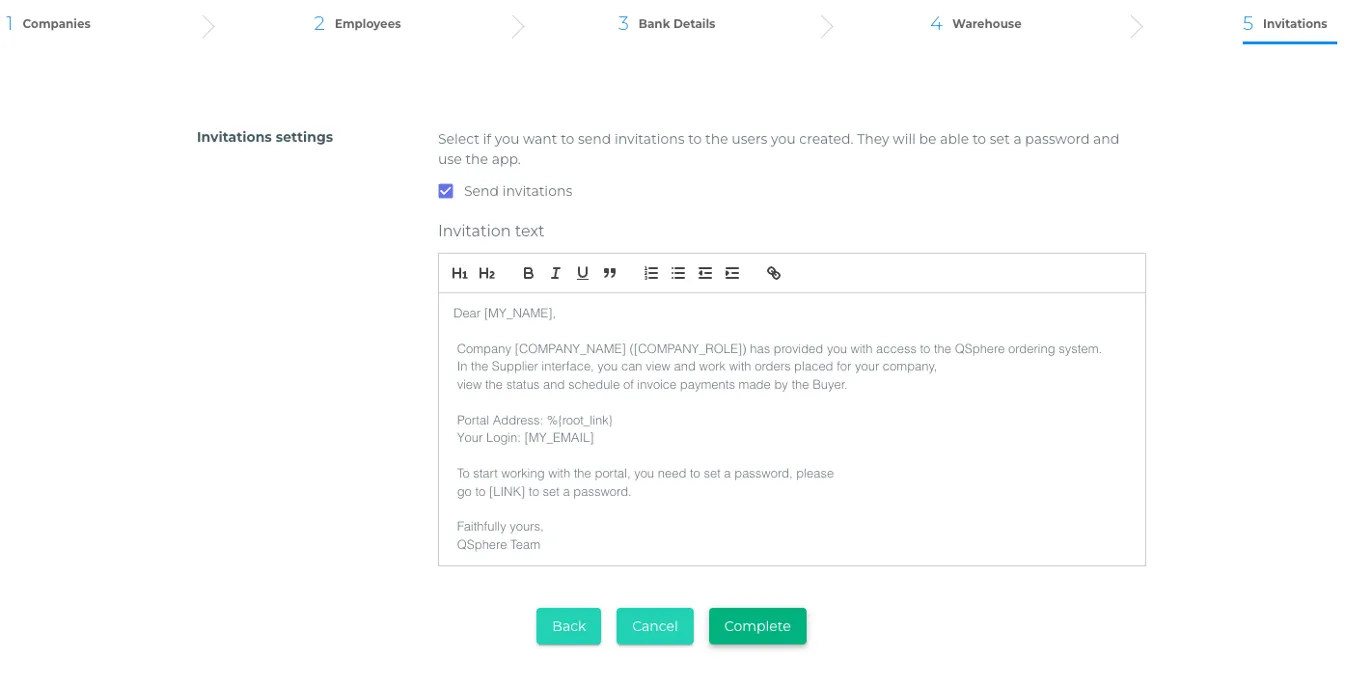
- Next, the "Invitation Settings" menu will open. Note for the user in this block: "Select if you want to send invitations to imported users. They will be able to set a password and use the application." It is possible to select the "Block users" option. Note for the user in this block: "Select if you want to add users to the application but want to delay their connection (use) of the application (resource). You can later unblock users on the supplier company tab." Below is a form for editing the invitation text that will be sent to the email addresses specified in the imported file.
- After sending the invitations, the message "Company import completed successfully!" appears with the option to import another Excel file or return to the company page.

Add suppliers manually one by one
Fill in the 4 main sections:
- Company: the main fields here (some are mandatory): Company name, Country (drop-down list), Company phone number, Company address, Company website, Company tax number, Delivery terms (text field, for example, specify the pickup address), Payment terms (text field, these payment terms will be automatically entered into printed forms when placing orders). You can enable or disable the following functions:
- Display invoices to the supplier
- Display packing slips to the supplier
- Short labeling in QR codes
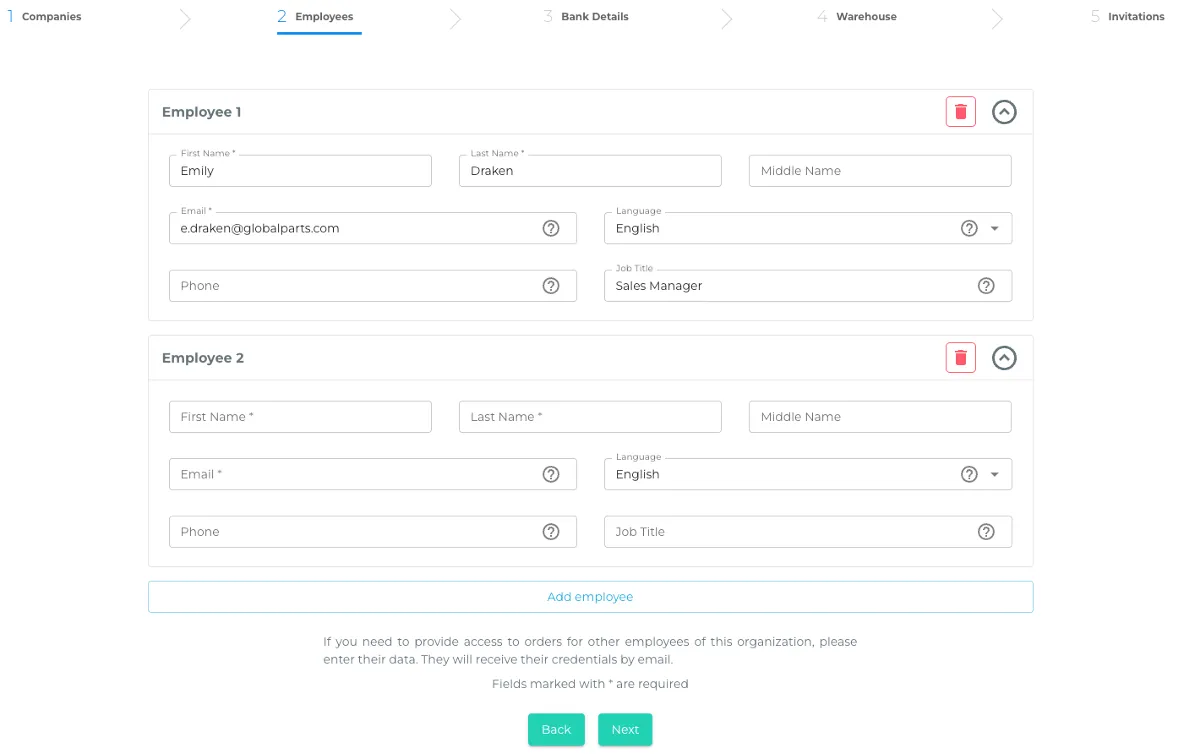
- Employees. Full name, email, language (choose from English, Chinese, Russian, Turkish), phone number, position. Note for the user in this block: "If you need to provide access to requests for other employees of this organization, please enter their details. They will be sent their login details by email."
- Bank details. You can skip filling in this block. Main fields: Currency (drop-down list from Euro, US Dollar, Polish Zloty, Russian Ruble, Belarusian Ruble, Kazakhstani Tenge, Turkish Lira, Kyrgyz Som, Chinese Yuan), Bank country (drop-down list with a large number of countries), Bank name, Current account (text field with comment: Your bank account number; if you specify it, your account number will be indicated in the signature on documents and in orders to suppliers), SWIFT/Bank indicator (text field), Additional information. Note for the user in this block: "Adding a bank account for the company is not a mandatory operation, but filling in the details will allow you to immediately indicate the bank details of the organization to which the invoice can be issued in the printed order forms."
- Warehouse. Fields: Warehouse name (text field), Warehouse address (text field). Note for the user in this block: "This step is not mandatory, but you can specify an additional warehouse for the supplier's company. When entering one of the fields, the second field is mandatory."
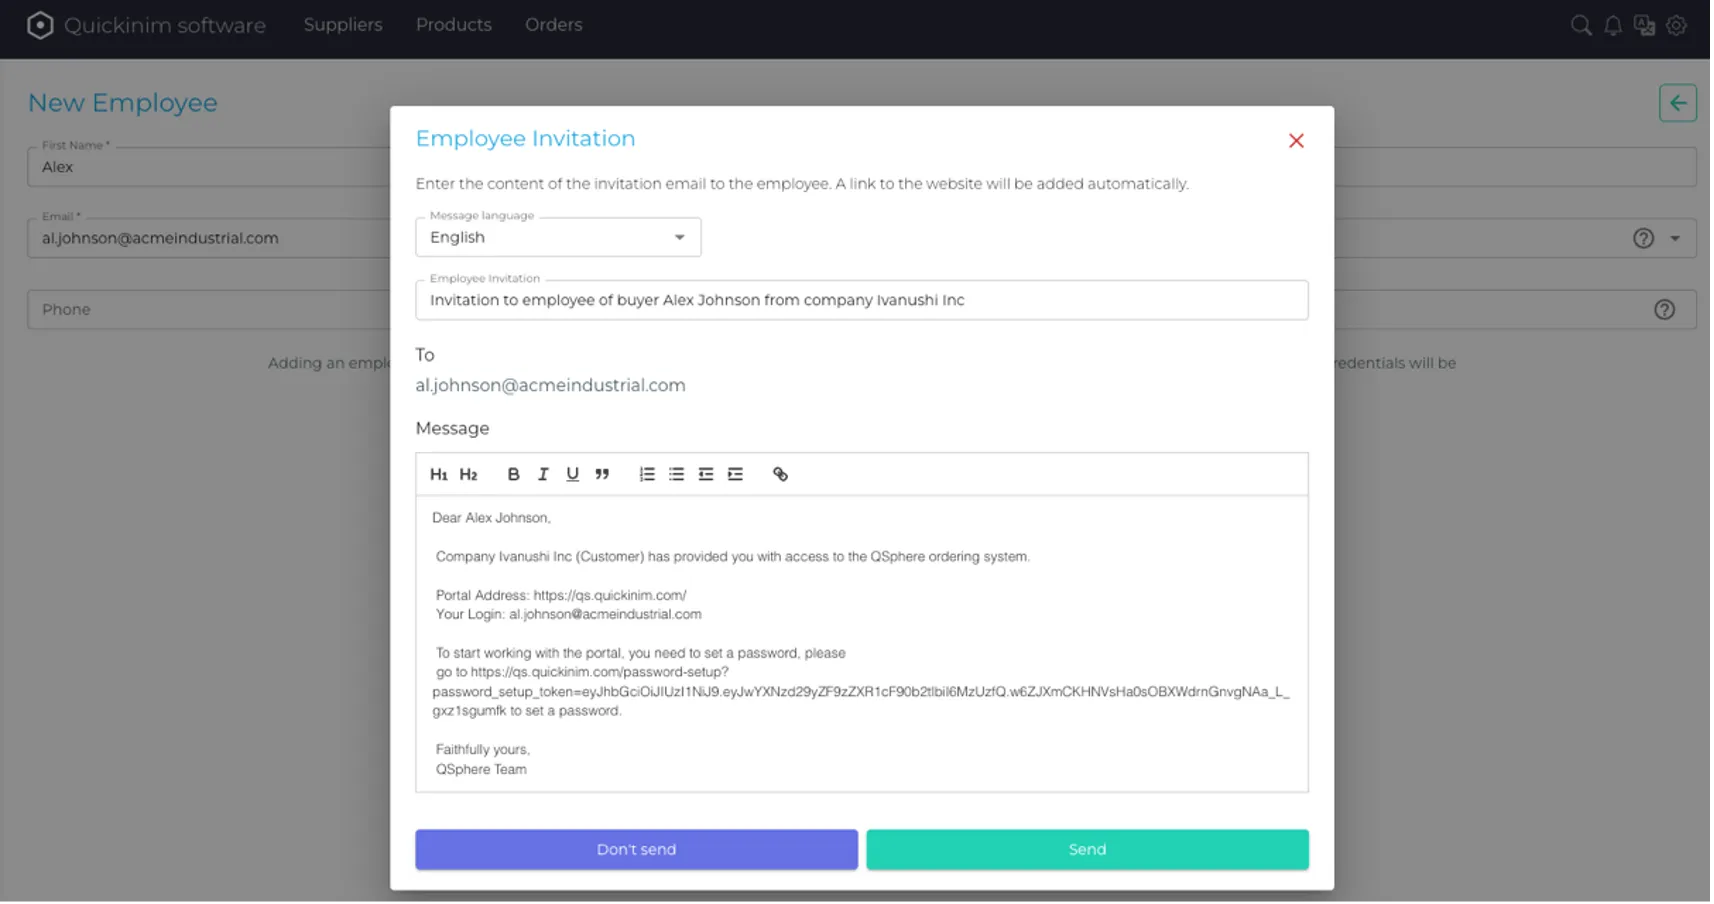
Invitation to employee
After filling in these fields, the "Invitation to employee" form opens. Note for the user in this block: "Enter the content of the invitation letter to the employee, which will be sent to them by email. A link to the website will be added automatically."
You can select the language of the email (English, Chinese, Russian, and Turkish are available), the letter templates are already filled in for each language and are selected automatically with the option to edit the text. The recipient's address is taken from the previously filled in field.
Letter text:
Dear {employee's full name},
The company {Buyer's company name} has provided you with access to the Quickinim order placement system.
In the Supplier interface, you can view and work with orders placed for your company, view the status and payment schedule of invoices by the Buyer.
Portal address: {link to UI}
Your login: {recipient's email address}
To start working with the portal, you need to set a password. Please follow the link to set your password.
Sincerely,
The Quickinim Team.
Additional actions in the supplier card
After sending an invitation to the supplier, the "Edit Company" form opens, allowing you to view the information entered and add more information about the supplier. Additional actions in the supplier card (in each of the blocks, you can switch to full-screen mode for more convenient editing):
- You can add additional New bank details.
- Add new employees of the supplier company or block selected ones — the system will ask for confirmation: "(if employee 1) Do you want to block the only employee of the supplier company who has access to the system? After completing the operation, the supplier company will be blocked, and all of the supplier's products will be transferred to 'Inactive products' status. Are you sure you want to block the selected employee?"
- Add a new warehouse or edit a previously added one. You can view the editing history with information about the date of the change, the author (specified by account), and the type of change (for example, creating a warehouse).
- View the general change history for the supplier card.
- Upload files
Adding products
Add Products to Supplier companies
Information window for users: "Before you start working in the Quickinim system, you need to add Products to Supplier companies. Each supplier has a set of products that they supply to your company."
When adding a product, the following fields must be filled in:
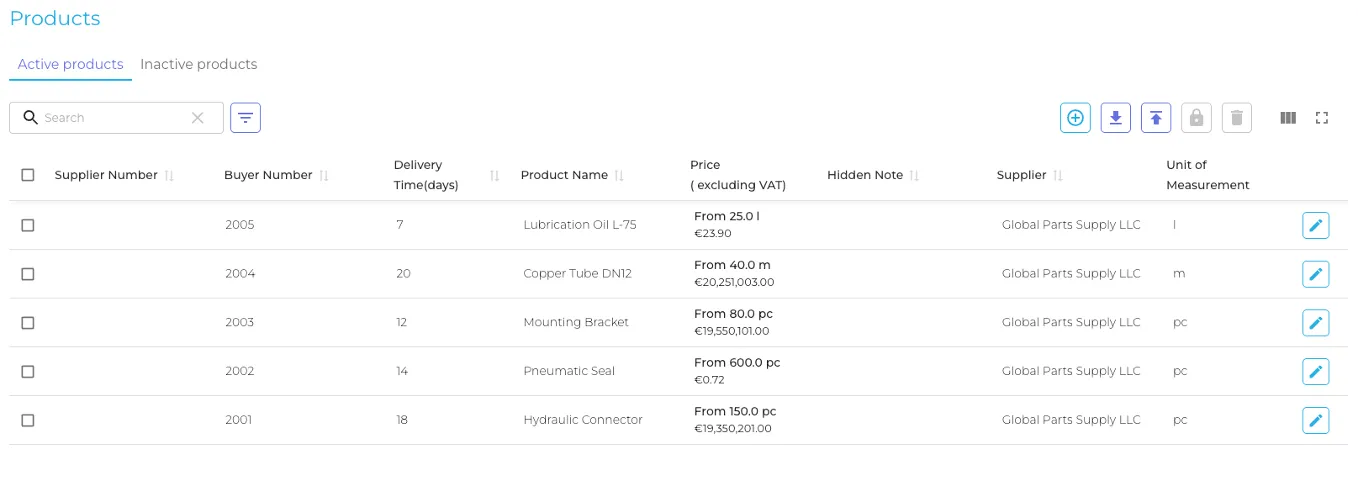
- General information. Fields: Supplier name (drop-down list of previously added suppliers), Product name (text field), Status (Active/Inactive drop-down list), Buyer's item number (comment here: "Enter the buyer's item number. If your system has already assigned an item number to the product, enter it into the system. If there is no item number, leave the field blank, Quickinim will automatically generate and assign an Item number"), Supplier item number (comment here: "Item number in the Supplier's system, this item number will be entered in the order form and will allow the Supplier to quickly identify the ordered Item. This field is not mandatory"), Unit of measure (drop-down list from KG, M, M2, M3, L, PC, pkg, T)
- Additional information. Description (text field), Delivery time (days), Warranty (months), Customs code, Net weight, Unit of measurement for weight (drop-down list from Ton, Kilogram, Gram, Milligram, Pound, Ounce, Gran), Buyer's comment (the buyer's comment will be visible to the supplier when placing the order and will also be included in the printed order forms), Comment hidden from the supplier.
- Prices. You can add several prices with the specified quantity of goods (enter the value, the units of change will be substituted from those selected earlier), Price (excl. VAT) – you can specify several prices per unit in one price with a choice of different currencies (drop-down list from Euro, US Dollar, Polish Zloty, Russian Ruble, Belarusian Ruble, Kazakhstani Tenge, Turkish Lira, Kyrgyz Som, Chinese Yuan).
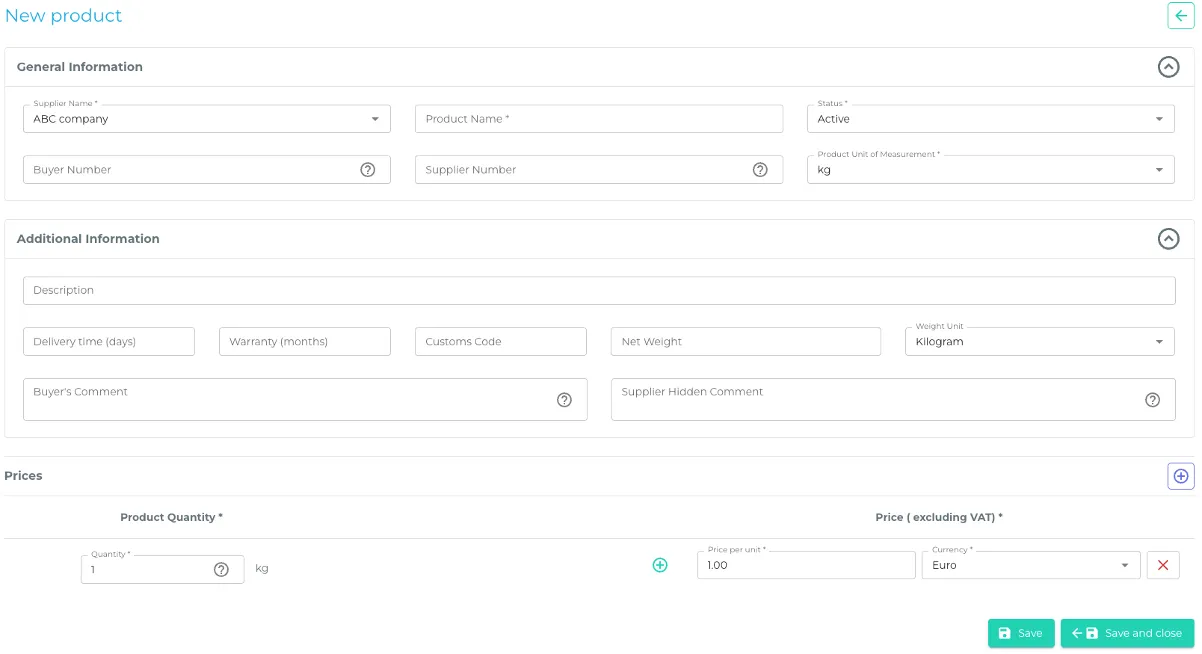
Any product can be copied to quickly create the next one. The list of added products includes Active and Inactive products (2 different tabs). You can perform the following actions: Edit the selected product, Add a product, Import or export a product (via Excel files), make a product inactive (or vice versa, Active for the Inactive list) or delete it. You can customize the visibility of columns and change their order.
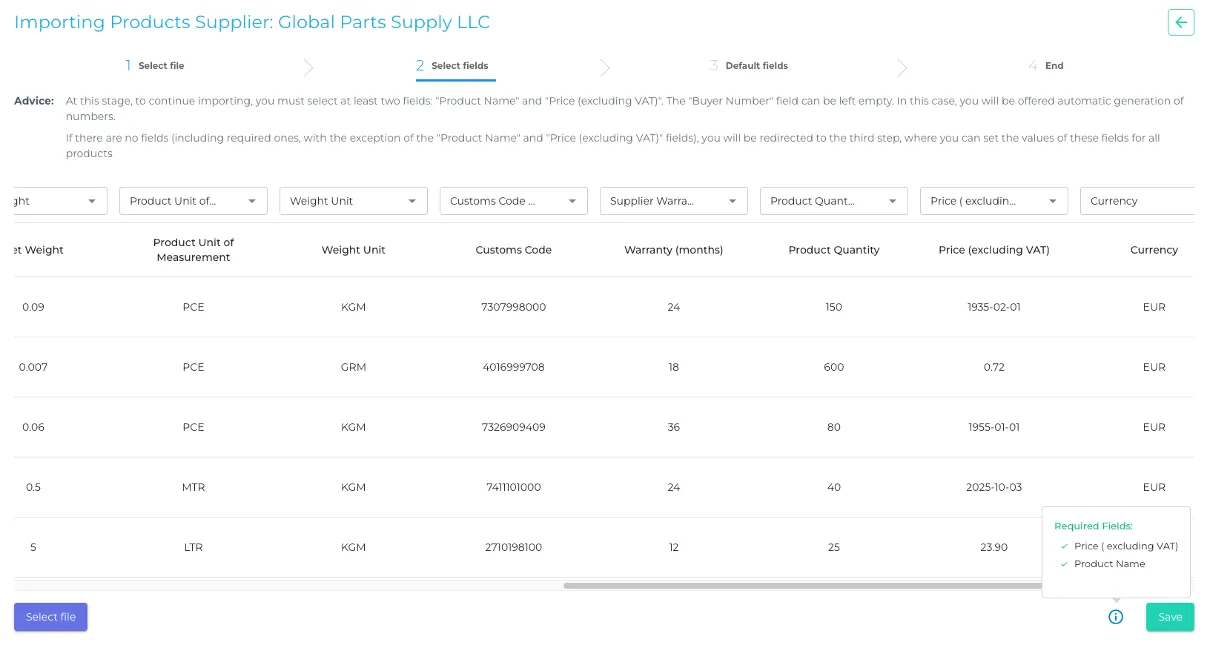
Import products from file
You can also add a product by importing a file. Note for the user in this block: "Please select an Excel file to add new Supplier products. The Excel table must contain rows, each row containing data about the Supplier's products, as well as columns that will be assigned to the Supplier's product fields in step 2 of the wizard.
If some fields are missing (including mandatory fields, except for the product name and price), in step 2 you will be redirected to step 3, where you can set the values for these fields for all products.
Required fields:
- Buyer's item number
- Product name
- Product unit of measure
- Quantity
- Price (excluding VAT)
- Currency
Important! The buyer's item number can be left blank, in which case you will be offered automatic item number generation.
The other fields are optional.
The top row of the Excel file must contain column names (headings) and be located in the first row.
An example of the Excel file structure can be downloaded from the link.
Before you start importing, select the company for which the goods will be imported.
The user is prompted to download an Excel template file to fill out and upload to the system and select the supplier company (drop-down list of previously added suppliers). After uploading the file, the UI opens a page with the mapping of the fields filled in from the file and the fields in the system (product card).
After successful mapping and saving, the system will redirect you to the Completion block and display the message: "The import of the company's goods was successful!" with the option to choose between Import another file or Return to the goods page.
Creating orders
Create a Company Order for the Supplier
Information window for users: "Select the Supplier, currency, and products you want to order from the Supplier. The Supplier will receive a notification about the new order placed with a request to confirm the order."
When adding a product, you can either create it manually or import it from a file.
Manual order creation
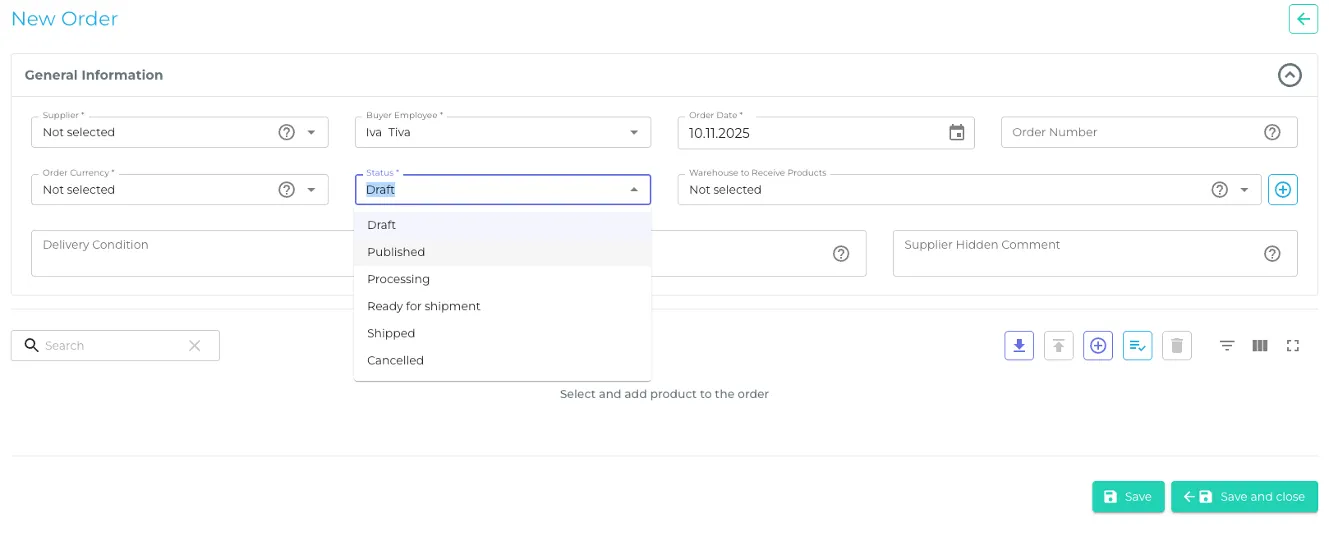
In manual mode, you must fill in the "General Information" block:
- Supplier (drop-down list of previously added suppliers)
- Buyer's employee (select from the drop-down list)
- Order date
- Order number (if not entered, it will be generated automatically)
- Order currency (drop-down list from Euro, US Dollar, Polish Zloty, Russian Ruble, Belarusian Ruble, Kazakhstani Tenge, Turkish Lira, Kyrgyz Som, Chinese Yuan)
- Status (drop-down list: Draft, Published, Processing, Ready for shipment, Shipped, Cancelled). It is assumed that when an order is created, it is assigned the status Draft – in this state, the order is not visible to the supplier. When editing the order is complete, the purchaser changes the status to Published, and the order becomes visible to the supplier in the system on their side. The supplier then follows the order through the business process statuses to Shipped or Cancelled, with the ability to change delivery dates, indicating the relevant reasons in the order comments and notifying the purchaser. The history of order status changes will be visible in the History tab when editing the order.
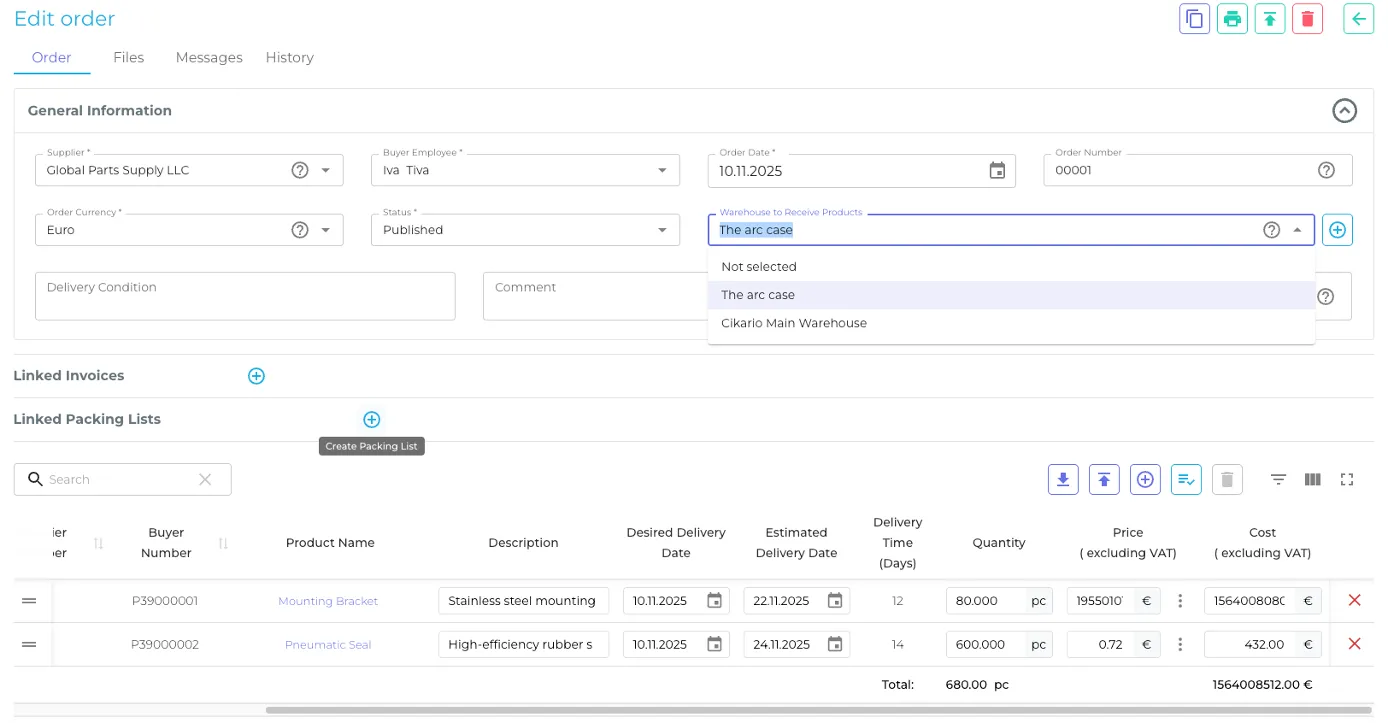
- Warehouse for receiving goods (select from the drop-down list of previously added items. Comment: "The warehouse for receiving goods is the address to which the goods will be delivered to the buyer. The address is selected from the addresses of the Supplier and the Buyer. Warehouses are added in the company profile. The warehouse field in the order is mandatory."). It is possible to add a new warehouse from this menu – separately for the buyer and the supplier.
- Delivery terms (text field)
- Comment
- Hidden comment
.webp)
Import orders from file
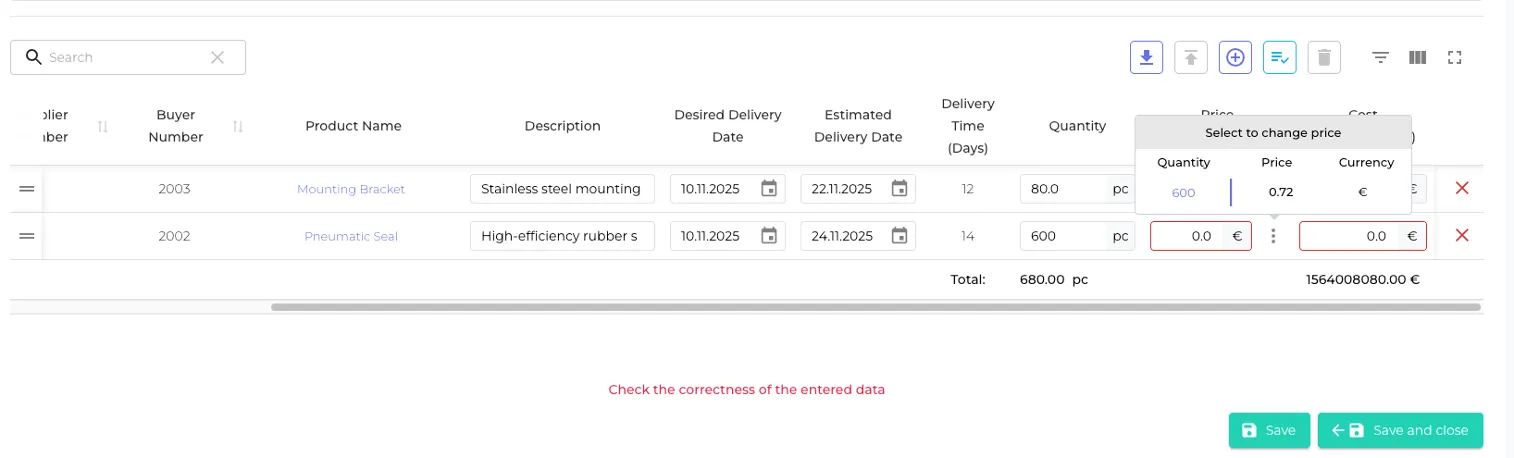
From the manual order addition menu, you can import a list of orders via an Excel file. An additional download menu will open with the option to download a template, mapping fields from the file and order card. After successfully downloading the file, the list of goods (which was specified in the file) will be displayed in the menu with the following options:
- Copy the product line (for quick creation of a similar one)
- Replace the product line. An additional menu will open with the option to select a product (from the list of added products) to replace, with the ability to search for the desired product. In this menu, you can customize the visibility and order of the displayed fields
- The product name is clickable and displays all previously entered information about the added product in a separate window on top of the current one
- You can add an order description or change what was added from the file
- You can change the "Desired delivery date" and "Planned delivery date"
- You can change the required quantity of each product in the order. The change will affect the total cost. Information about the total quantity of goods by unit of measurement is displayed (for example, if several products are specified in pieces, several in m2, then the total information will be displayed separately for all pieces and m2)
- You can change the price—the default price will be the price specified in the product card, but you can enter a different price while retaining the option to autofill the original price
- You can influence the cost of the order by item — enter your own value or leave the automatically calculated value
- You can create a new product for the supplier selected in the order card
Order editing functionality
After saving the order card, you can edit the order with the following functionality:
- Link the invoice to the order – a separate menu for adding a new invoice will open (the functionality is described below)
- Add packing slips related to the order – a separate "New packing slip" menu will open (the functionality is described below)
- Print order – you can choose to download the order file in .pdf, .docs, or .xlsx formats
- Export the order in the formats of your choice: xml, json – one of the options for use: for further import of the order into the ERP system
- Add files to the order
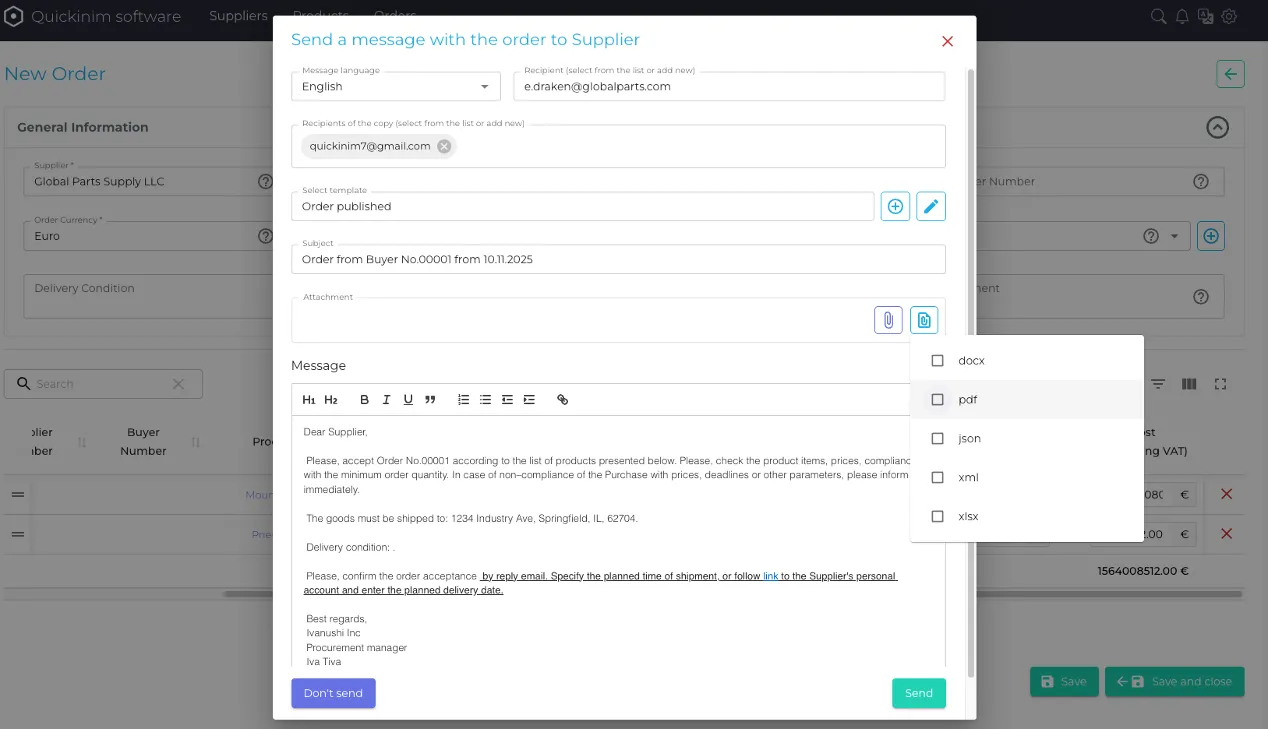
- Messages – a menu block where you can view the history of correspondence with the supplier, send new emails to the email address specified in the supplier's card, and add any emails of interested parties. The "Send new message" function is a separate window with a language selection, fields for entering the email addresses of recipients and recipients of copies, a choice of email templates, the option to create a new template or edit an existing one (templates are available in the system settings and are described below), an email subject line, the option to attach necessary files, and a text field (where text from the selected template is inserted)
- History – a list of actions related to the order, indicating the date, employee, and type of action
Orders menu
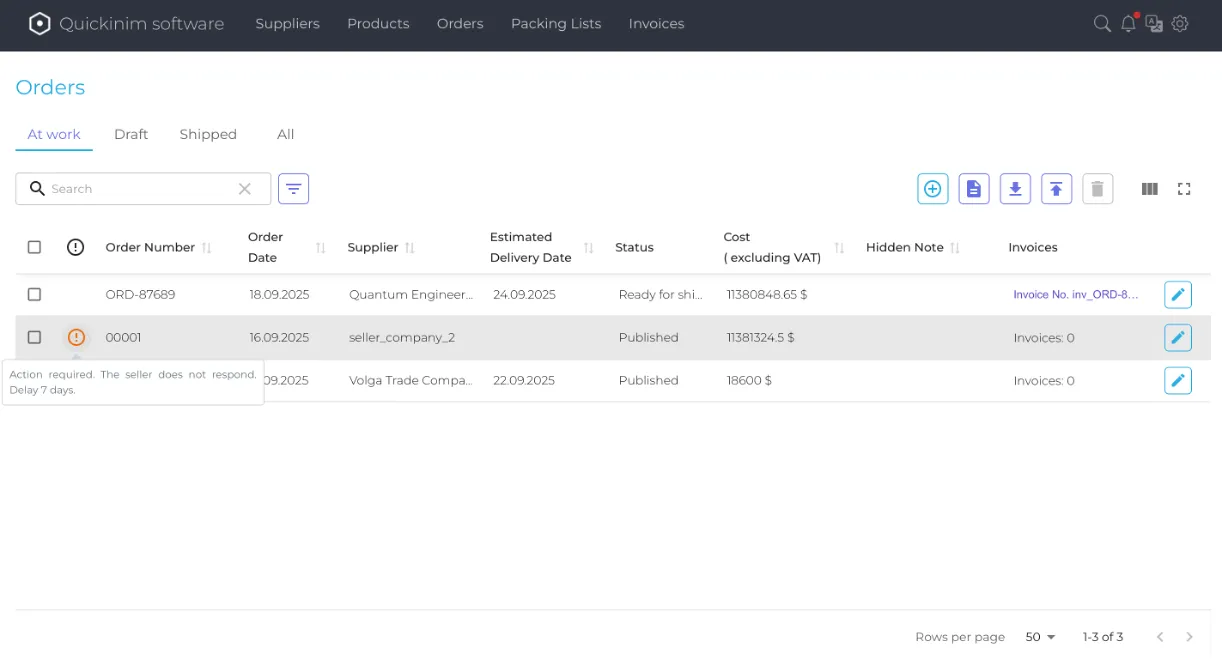
The menu for all orders contains a list of orders by status: In progress, Draft, Shipped, All (displays a list of all orders in any status). You can customize the visibility of columns and change their order. There is an important field called "Requires attention" that marks orders that, for example, have a payment term exceeding N days (a parameter that can be configured in the advanced system settings). The following actions are possible:
- Search and filter: You can search for the order you need by keywords from the order fields. There is a filter by order columns, after filling in and applying which, the corresponding filtered list of orders will be displayed.
- Create a report on orders: A separate window for creating a new report will open with the ability to filter by the following fields: Order date From/To, Desired delivery date From/To, Planned delivery date From/To, select suppliers (drop-down list from those previously added to the system, you can select several), Order status (drop-down list of all statuses, you can select several). At the bottom of the page, there will be a "List of order reports" with the option to search for a previously created report. Report creation is started by clicking the "Create report" button.
To build a report, you can also check the following functions:
- "Show production matrix" — if selected, you will be able to additionally select the "Group by calendar weeks" checkbox
- "Add data on ordered items to the report" — if selected, you will be able to additionally select the "Show cost" checkbox
- "Add a comment hidden from the supplier to the report"
- "Show order status changes"
- Import order from file: You can select the file format in which you want to import the order: JSON, .XML, .XLSX. Clicking on each of the formats will open an additional information window with the option to download the corresponding file template, but even if one of the import options is selected, you can change the selection to any of the three formats in this additional window. After downloading and filling out the selected template, click the "Import order" button and the familiar "Import orders" window will open (described above):
- JSON - Please note that unlike importing an Excel table, there is no selection of columns for each field. Therefore, if you want to import a file that was not generated by the current system, we recommend that you familiarize yourself with the sample file. An example of the structure of a JSON file can be downloaded from the link.
- .XML – (similar to JSON)
- .XLSX - Please select an Excel file to add orders to the system. The Excel table must contain rows, each row containing data about the order and individual items in it, as well as columns, which in step 2 of the wizard will be assigned to the order and item fields, respectively. Required fields: Quantity; Price per unit (excluding VAT). At least one field from: Product name; Buyer's product code; Supplier's product code; Item description. Important: The remaining fields are optional. The top row of the Excel file must contain column names (headings) and be located in the first row. An example of the Excel file structure can be downloaded from the link.
- Export orders: You can export a selected order or all orders to an Excel file (even if specific orders were selected in the previous window).
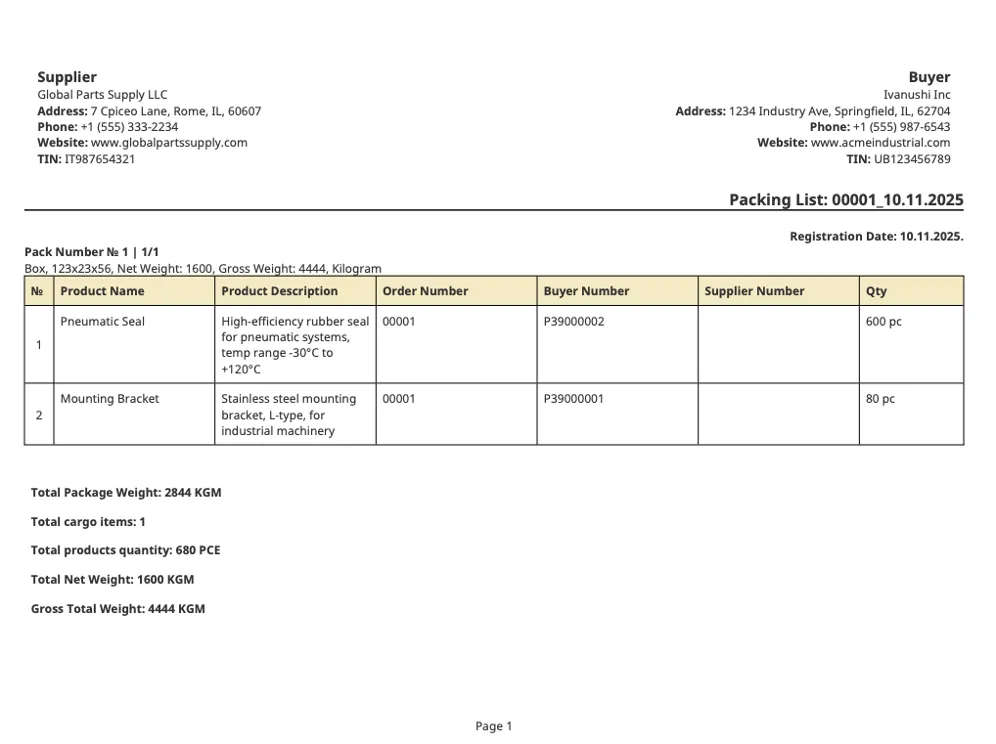
Packing lists
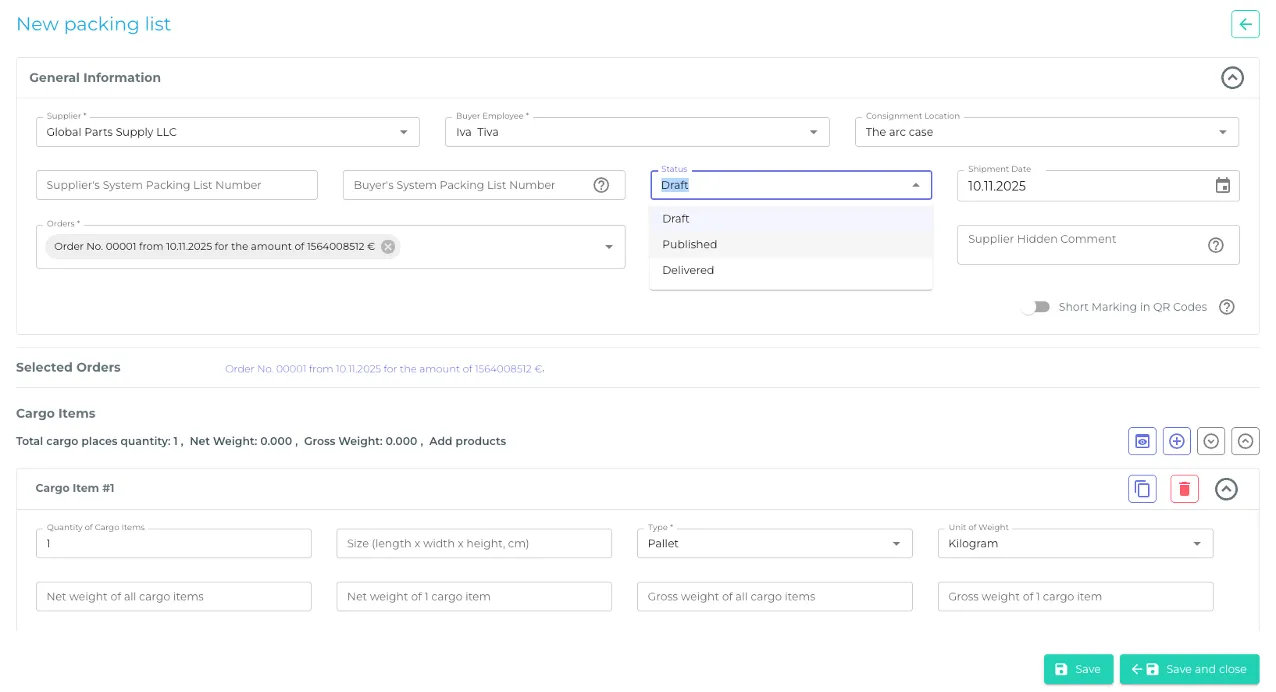
Create a packing list from the Supplier
Information window for users: "Please select Orders placed with Suppliers, fill in and attach packing lists for the shipment."
The "New packing list" creation menu allows you to add information to the shipment for convenient receipt of goods by the buyer. You can select the "Short labeling in QR codes" option. If enabled, some of the information will be missing when scanning the printed labels. The following information can be specified in the packing list:
- Specify the supplier (drop-down list of previously added suppliers)
- Selection of the buyer's employee - allows you to maintain personal responsibility for orders, the supplier can specify the manager from the buyer with whom he communicated in the QS system. This will also allow employees at the buyer's warehouse to contact the specified employee on their side, associated with a specific shipment, to resolve issues related to the shipment
- Batch location – a drop-down list of warehouses specified for the selected supplier
- Supplier packing list item number
- Buyer's packing list item number - If not entered, it will be generated automatically
- Status – drop-down list from Draft, Published, Delivered
- Shipment date
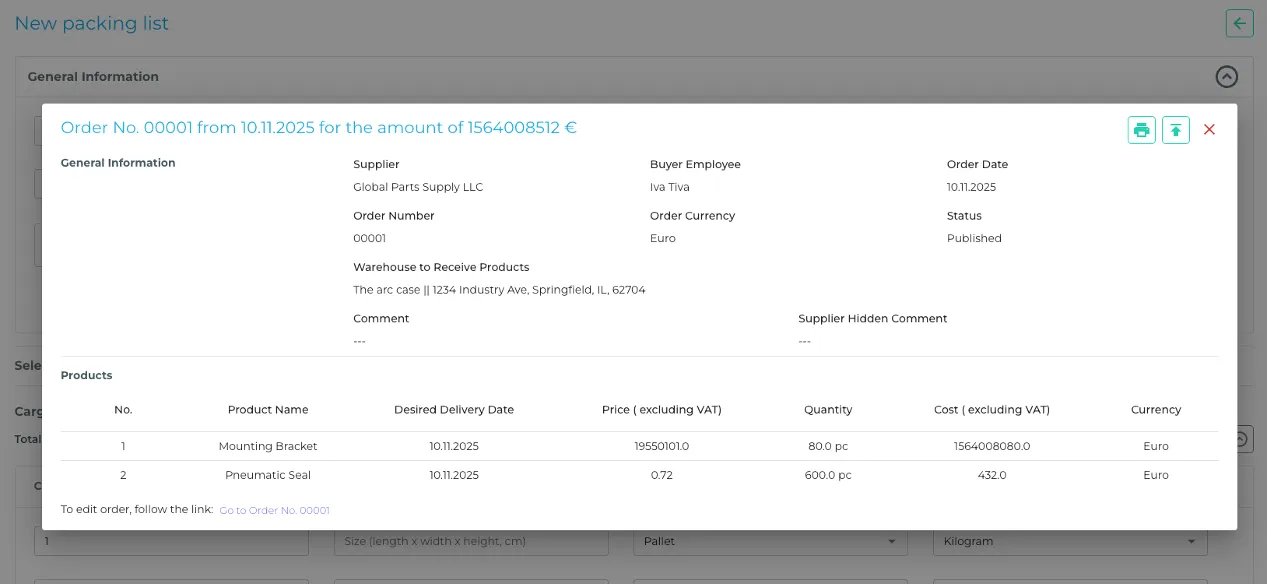
- Orders – a drop-down list of published orders associated with the supplier; multiple orders can be selected. For the selected orders, you can view detailed information about the order, a list of goods, go to the order to edit it, print the order, or export it in xml/json formats.
- Comment – text field.
- Comment hidden from the supplier
- Specify "Cargo items" – information is specified for convenient acceptance of goods from the supplier by the buyer at the warehouse, helps to answer questions about what is in a specific shipment (box, pallet, etc.) where to unload – because shipments are combined with many deliveries and not all shipments in a batch are intended for current acceptance at the buyer's warehouse. You can add several cargo items (by copying any of the created cargo items or entering them manually). The following information is specified in the cargo item:
- Number of cargo items – numeric field
- Size (length * width * height, in cm)
- Cargo type – drop-down list from Pallet, Box, Cube, Barrel, Other
- Weight unit – drop-down list from Ton, Kilogram, Gram, Milligram, Pound, Ounce, Grain
- Net weight of all cargo items – numeric field
- Net weight of one cargo item – filled in automatically depending on the values in the "Net weight of all cargo items" and "Number of cargo items" fields.
- Gross weight of all cargo items – numeric field
- Gross weight of one cargo item – filled in automatically depending on the values in the "Net weight of all cargo items" and "Number of cargo items" fields. Regarding the values entered in the net/gross fields, the system provides for verification of correctness with corresponding notifications, such as "Net weight cannot exceed or be equal to gross weight."
- List of goods from the order – for each cargo item, the corresponding list of goods is indicated with the possibility to change the "Quantity in cargo items" for each of the goods. The specified quantity of goods is checked against the quantity of goods in the order and an error is issued if more units are specified than are actually available in the order.
.webp)

Packing lists menu
The menu for all packing slips contains a list of packing slips by status: Published, Delivered, Draft, All (displays a list of all packing slips in any status). You can customize the visibility of columns and change their order. The following actions are possible:
- Search for the desired order by keywords from the order fields. You can filter by order columns, and after filling in and applying the filter, the corresponding filtered list of orders will be displayed.
- Export orders. You can export the selected order or all orders at once to an Excel file (even if specific orders are selected in the previous window).
Packing list editing
After saving the Packing List card, you can edit it with the following functions:
- Change the values of the Packing List fields (the fields are described above)
- Print order – you can choose to download the packing list file in .pdf or .docs format
- Send a link to the packing list – a window will open where you can fill in the following fields: select the message language, enter the email recipient, enter the message subject, attach files (by default, .pdf and .docs files of the packing list from the system), enter the message text with a pre-filled version of the letter from the template and a link for editing the packing list
- Copy packing list – a new window will open for creating a packing list with the copied values
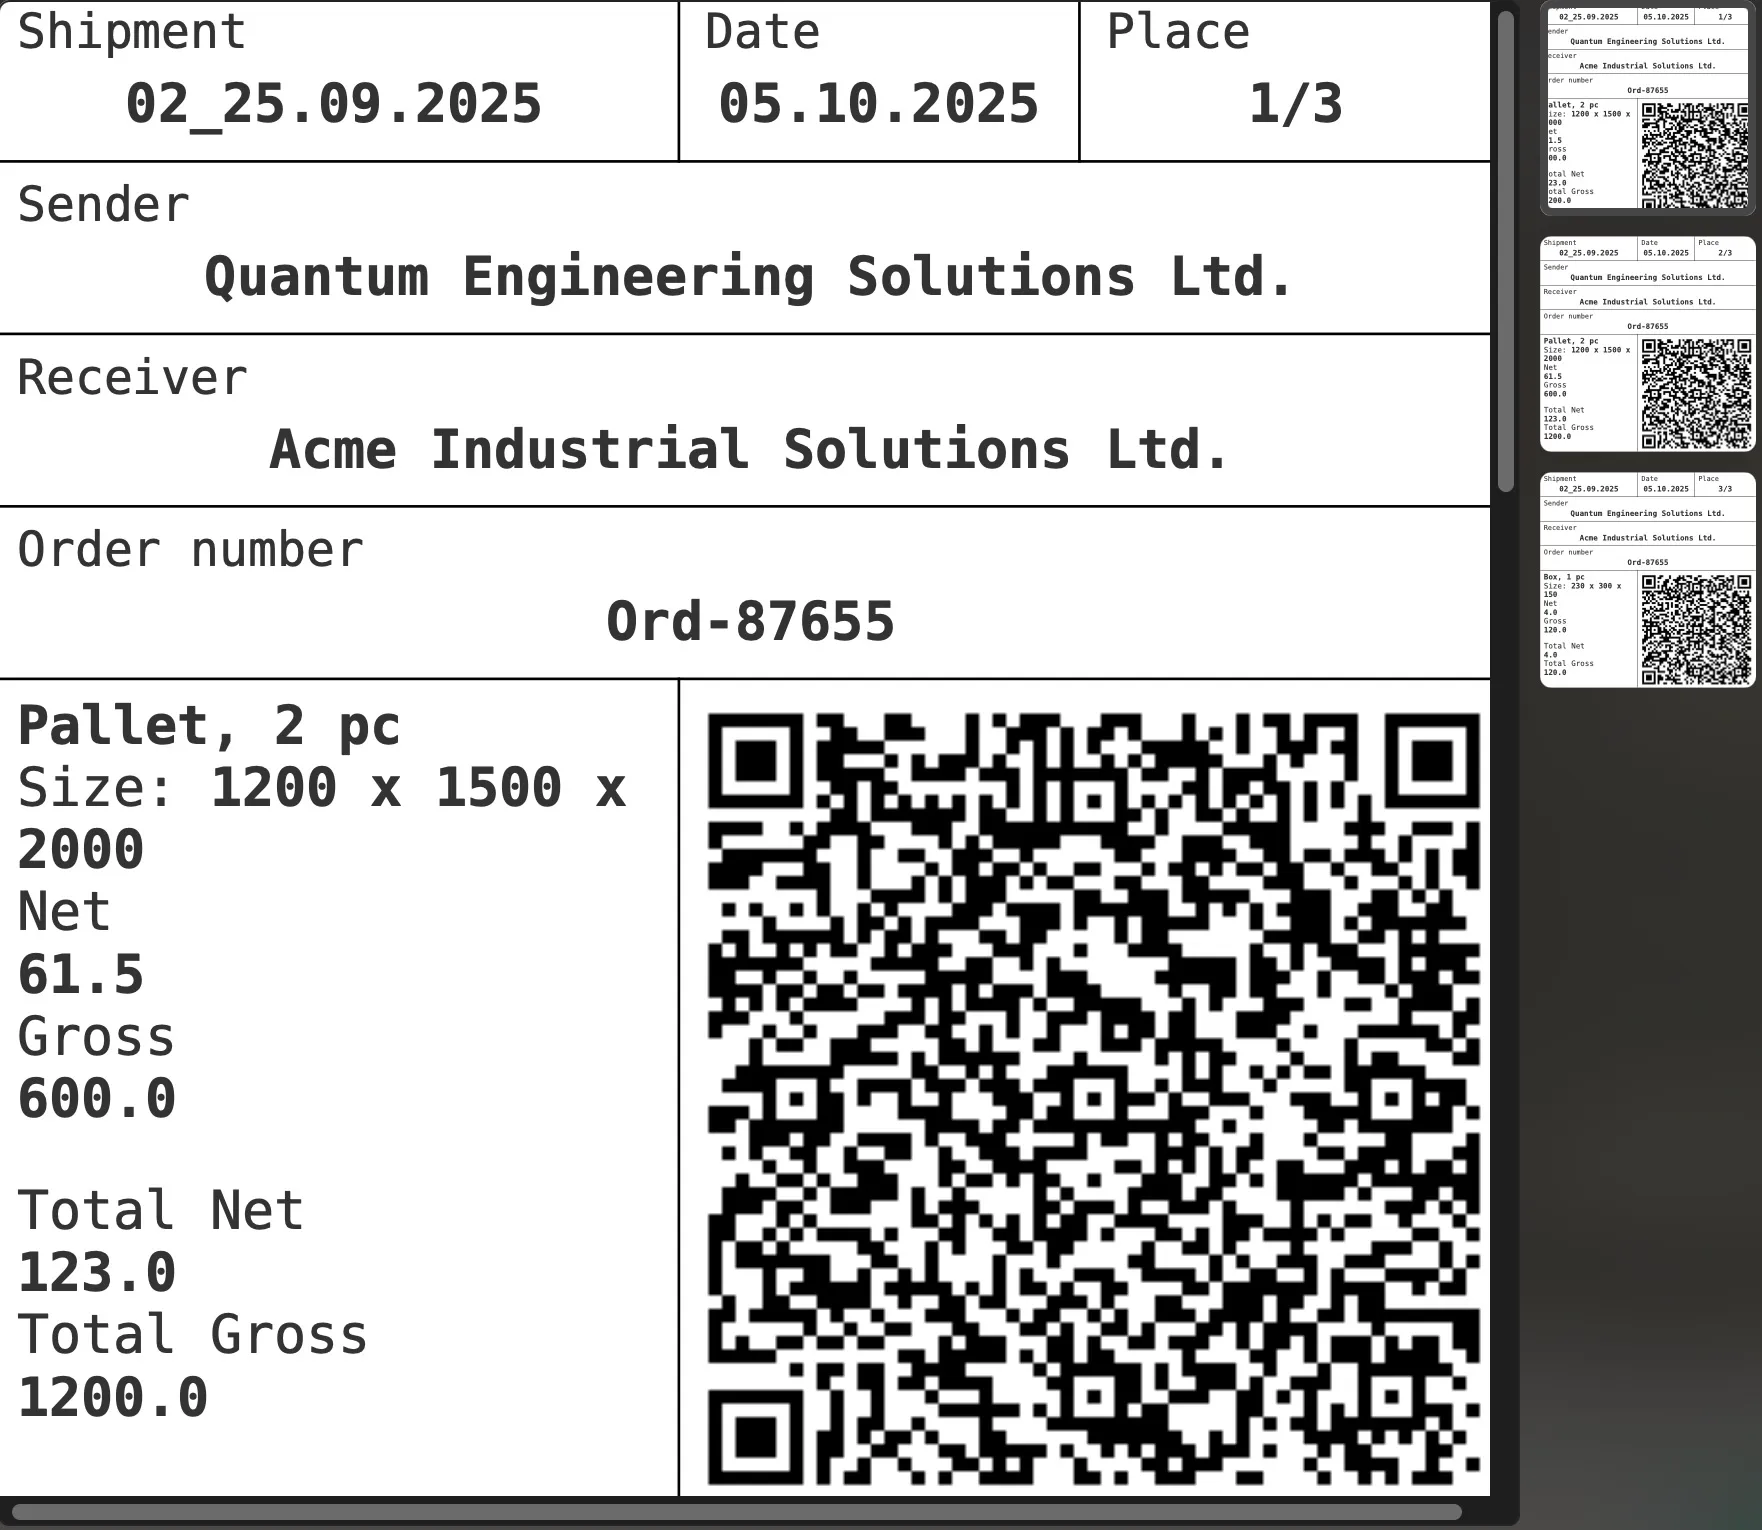
- Print label – option to download a .pdf file of the packing list with a QR code, which can be printed, attached to cargo items (pallets, boxes), scan it upon receipt at the warehouse from any smartphone (or similar device) and see all the key information about the cargo (the information will open as a browser page, even without a Quickinim account)
- Add files to the packing list
- Messages – a menu block where the correspondence history between the buyer and the supplier is kept. You can send new emails to the email address specified in the supplier's card and add any emails of interested parties. The "Send New Message" function is a separate window with a language selection, fields for entering the email addresses of recipients and carbon copy recipients, a choice of email templates, the option to create a new template or edit an existing one (templates are available in the system settings and are described below), an email subject line, the option to attach necessary files, and a text field (where text from the selected template is inserted).
- History – a list of actions related to the shipment, indicating the date, employee, and type of action
Creating invoices
Create an invoice from the Supplier's company
Information window for users: "Please select Orders placed with Suppliers, fill in and attach invoices from Suppliers for the orders placed, as well as the planned payment dates. Suppliers will be able to see paid and unpaid invoices in their Personal Account."
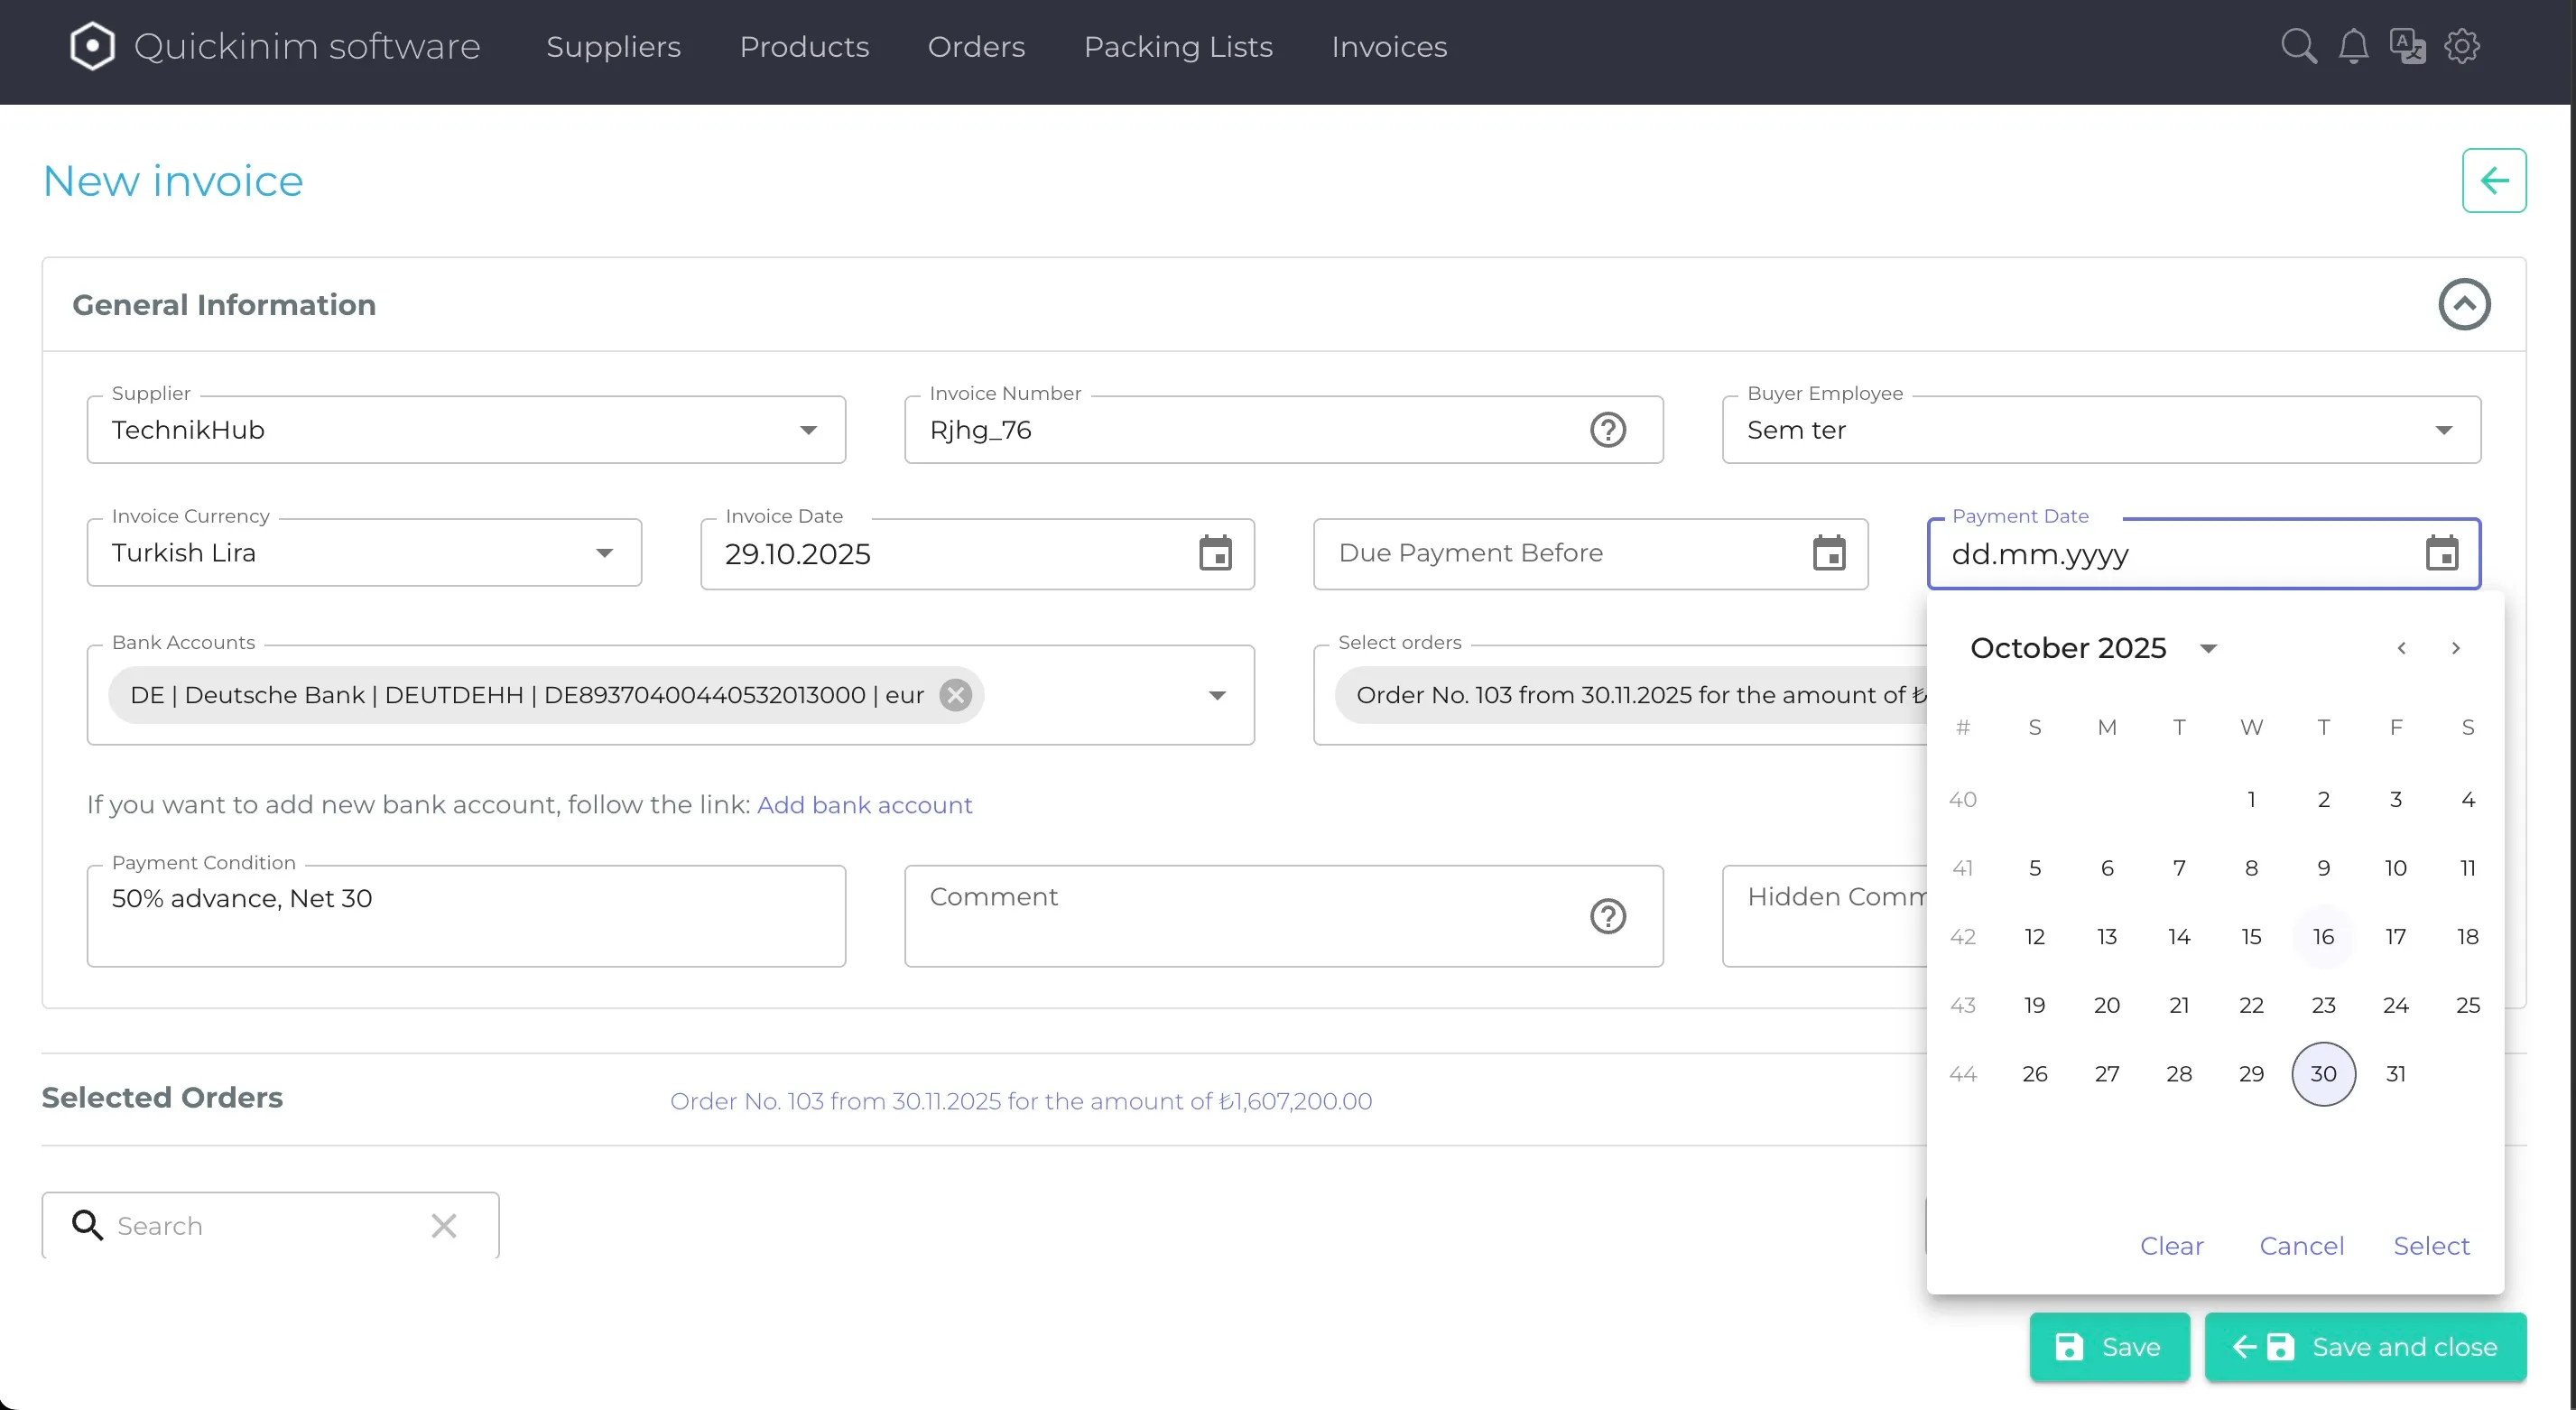
You can add a new invoice by filling in the following information in the "General Information" block:
- Supplier (drop-down list of previously added suppliers)
- Account number – text field. If not entered, it will be generated automatically.
- Buyer's employee (select from the drop-down list)
- Invoice currency – drop-down list
- Invoice date
- Payment due date
- Payment date
- Bank accounts – drop-down list of previously added accounts for the selected supplier. You can add a new bank account – the corresponding "Create bank details" window will open (described above)
- Select orders – drop-down list of added orders from the selected supplier, you can select several. Select orders to get the related lists of goods that will be available for selection in the "Items" category
- Payment terms – text field
- Comment
- Hidden comment
- List of goods from the order – a list of goods corresponding to the selected order with the ability to add a new item to the invoice, view a filtered list of goods by all the columns presented, you can customize the visibility of columns and change their order. For goods, you can change the values in the following fields:
- "Quantity" for each item
- Price (excluding VAT)
- VAT rate (%) – if you fill in the first lines with the same values, the system will suggest applying the same values to the entire list
- Cost (including VAT)
All Invoices menu
The All Invoices menu contains a list of accounts added to the system by status: Unpaid, Paid, All (displays a list of all accounts with any status). You can customize the visibility of columns and change their order.
The following actions are available from the All Invoices menu:
- You can search for the desired account by keywords from the account fields. There is a filter by order columns, after filling in and applying which the corresponding filtered list of orders will be displayed.
- Export orders. You can export the selected order or all orders at once to an Excel file (even if specific orders are selected in the previous window).
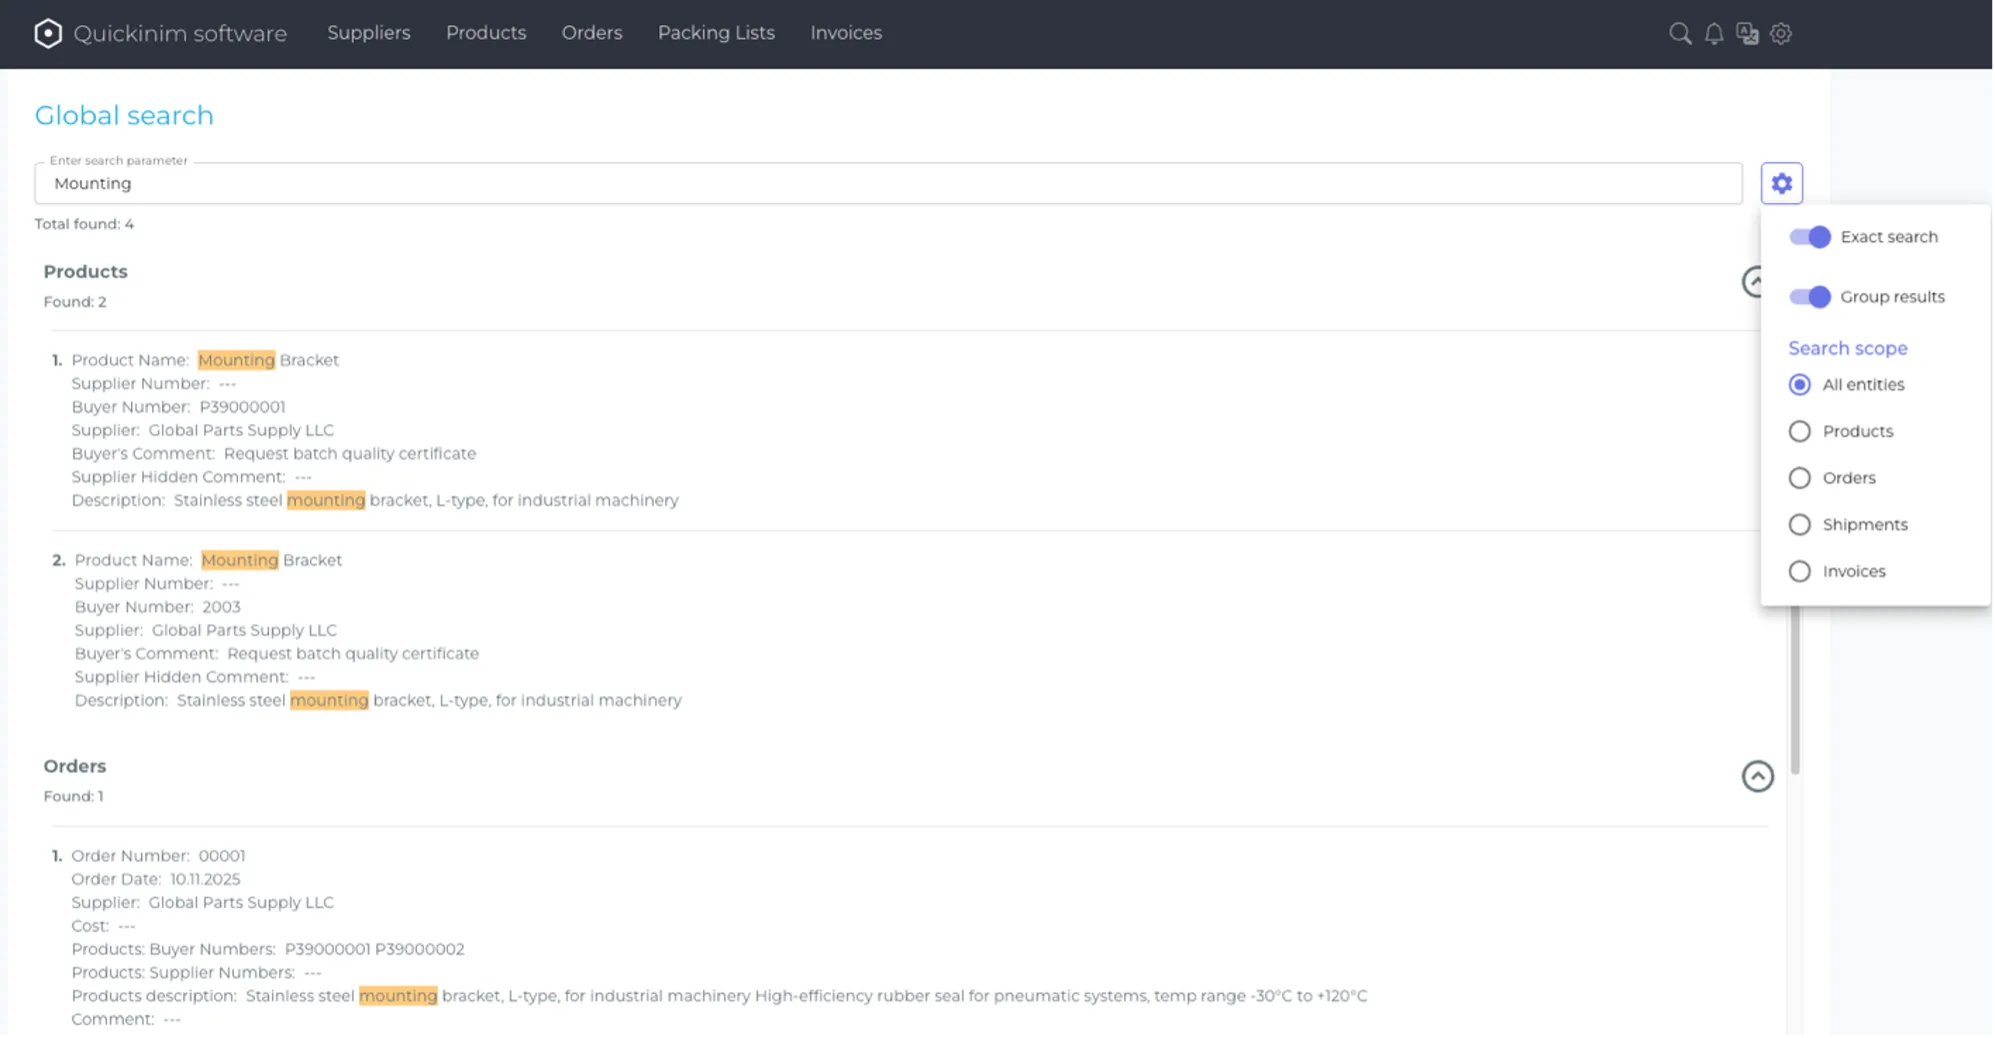
Global search
The system allows you to search for anything in the system with the ability to customize the search:
- Enable exact search – the system will search for a combination identical to the keyword in the system objects
- Group results – the system will display the found objects in the corresponding groups. For example, if several invoices are found, they will be displayed in a grouped list of Invoices
- Search area – option to select search areas: All entities, Products, Orders, Packing lists, Invoices
System settings
System settings consist of the following menu items:
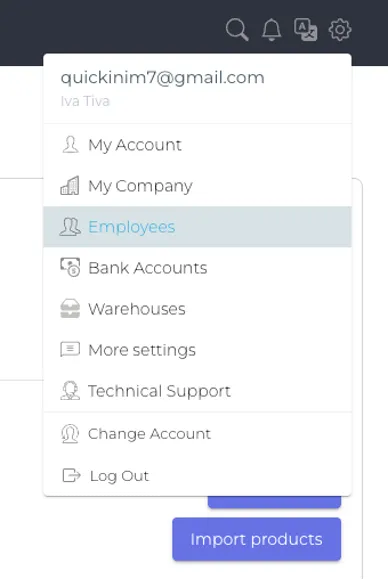
- My Profile
- My Company
- Employees
- Bank accounts
- Warehouses
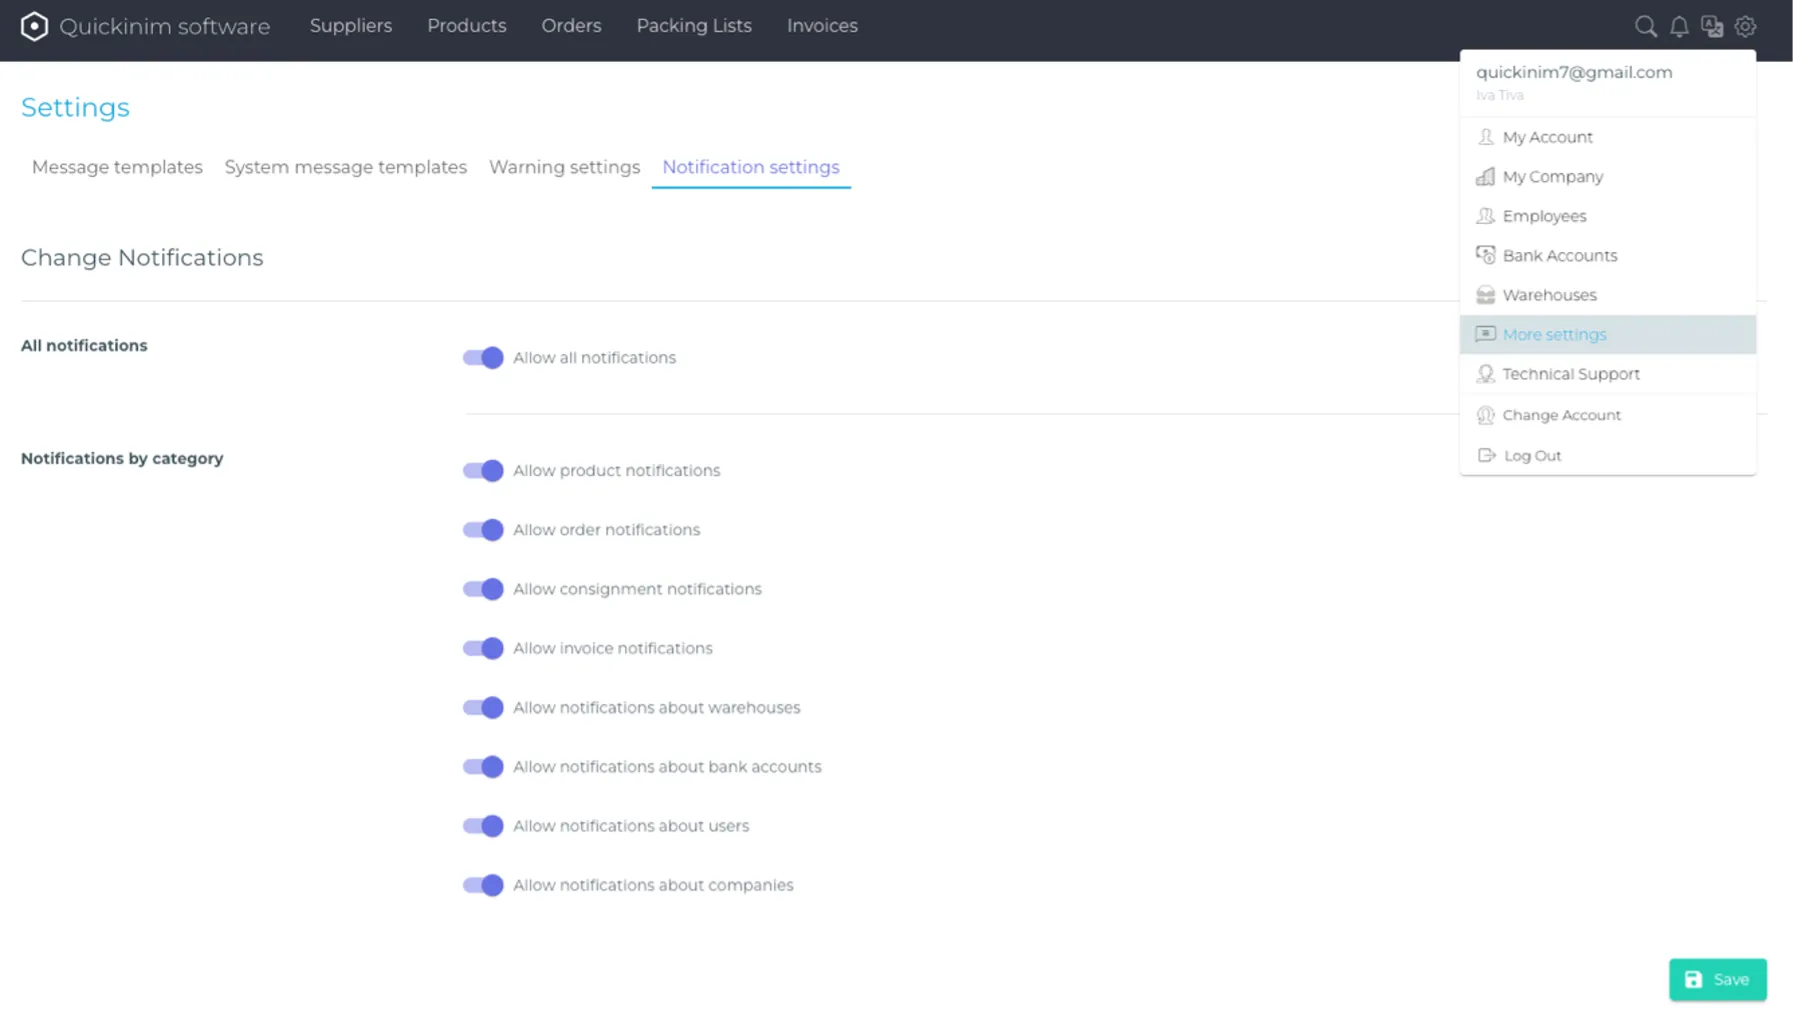
- More settings – contains a list of additional menu items:
- Email templates
- System email templates
- Alert settings
- Notification settings
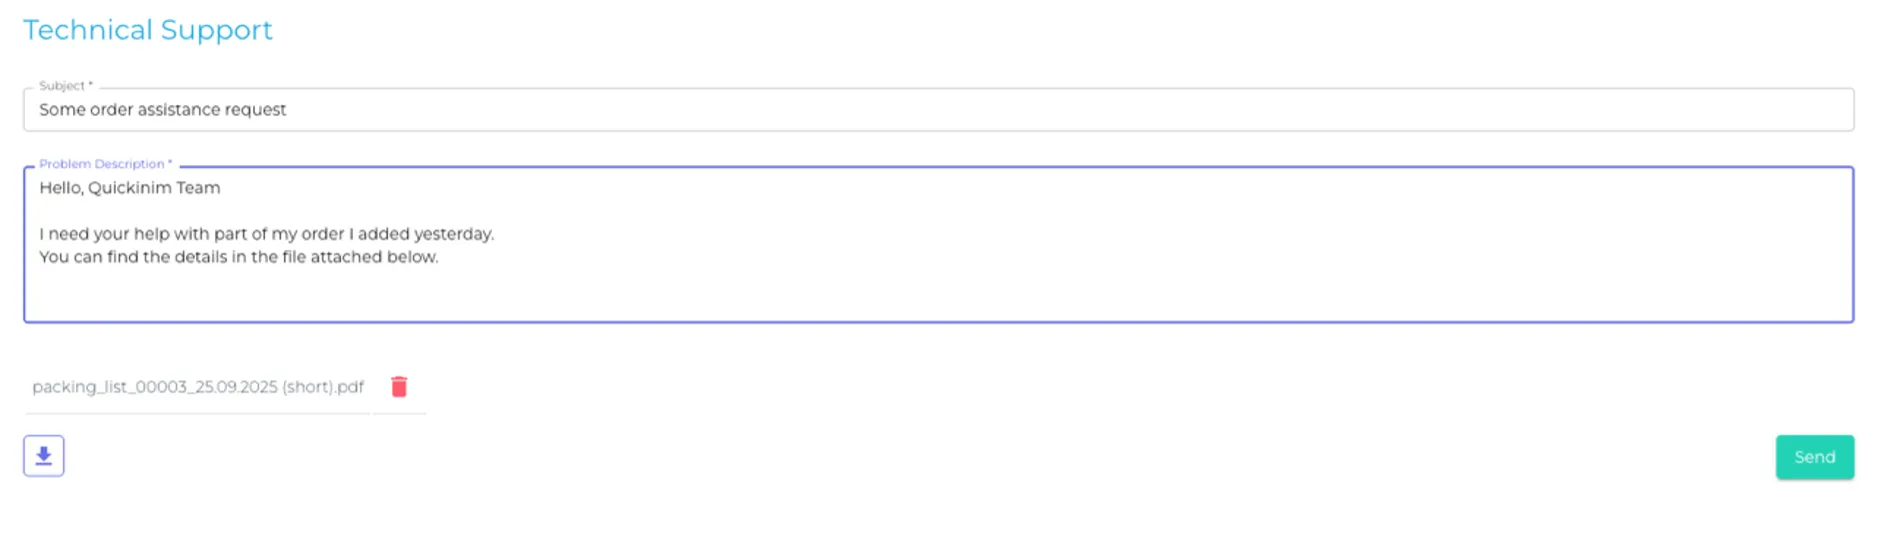
- Technical support - You can contact technical support via the form on the website with the option to attach a file. This feature is also available at the bottom of the main page
- Change Account - The system allows you to create multiple roles in the system for one email address - this button is used to switch between them
- Log out
User Agreement
Welcome! This User Agreement (hereinafter referred to as the "Agreement") governs your use of the Quickinim software (hereinafter referred to as the "Software") provided by Vavs LLC (hereinafter referred to as the "Company"). By using this Software, you agree to the terms of this Agreement. If you do not agree with any of these terms, you are not authorized to use the SOFTWARE.
1. License to Use
- 1.1 The Company grants you a limited, non-exclusive, non-transferable license to use the Software in accordance with the terms of this Agreement.
- 1.2 You may use the Software only for personal or commercial purposes, if permitted by the terms of the license.
- 1.3 You may not: Copy, modify, or distribute the Software without the express permission of the Company. Reverse engineer, decompile, or disassemble the Software. Use the Software in ways that violate applicable law or the rights of third parties.
2. Intellectual Property
- 2.1 All rights to the Software, including but not limited to copyrights, trademarks, and patents, belong to the Company.
- 2.2 This Agreement does not transfer any intellectual property rights related to the Software to you. You only receive the right to use the Software under this license.
3. Limitation of Liability
- 3.1 The Software is provided "as is," without any warranties, express or implied, including warranties of merchantability, fitness for a particular purpose, or non-infringement of third party rights.
- 3.2 The Company shall not be liable for any damages arising from the use or inability to use the Software, including, but not limited to, loss of data, profits, or other losses.
4. Updates and Changes
- 4.1 The Company reserves the right to make changes to the functionality of the Software, as well as to update or discontinue its operation at any time without prior notice.
- 4.2 You are responsible for updating the Software to the latest version in a timely manner to avoid compatibility or security issues.
5. Privacy
- 5.1 When you use the Software, we may collect certain technical data, such as:
- device information (e.g., device type, operating system version)
- Software usage data (e.g., frequency of use, errors or crashes)
- other information necessary to ensure the functionality and improve the quality of the software
- 5.2 We use this data exclusively for the following purposes:
- improving the functionality and performance of the software
- to correct errors and eliminate malfunctions
- ensuring the security and protection of the software
- 5.3 We undertake not to transfer your data to third parties, except in cases provided for by law or necessary to ensure the operation of the software (e.g., hosting providers or cloud services).
- 5.4 You agree that using the software means you're cool with us collecting and processing this data.
6. Termination of the license
- 6.1 The Company may terminate your license to use the Software if you violate the terms of this Agreement.
- 6.2 Upon termination of the license, you must stop using the Software and delete all copies of it from your devices.
7. Applicable law
- 7.1 This Agreement is governed by the generally accepted principles of international law and the rules applicable to agreements of this type.
- 7.2 Any disputes arising in connection with this Agreement shall be resolved through negotiation. If no agreement can be reached, the dispute shall be referred to the competent court at the place of registration of the developer company.
8. Miscellaneous
- 8.1 If any provision of this Agreement is found to be invalid or unenforceable, the remaining provisions shall remain in full force and effect.
- 8.2 Failure by the Company to exercise any right or provision of this Agreement shall not constitute a waiver of such right or provision.
Important:
By using the Software, you confirm that you have read, understood, and agreed to all the terms and conditions of this Agreement. If you have any questions, please contact us.
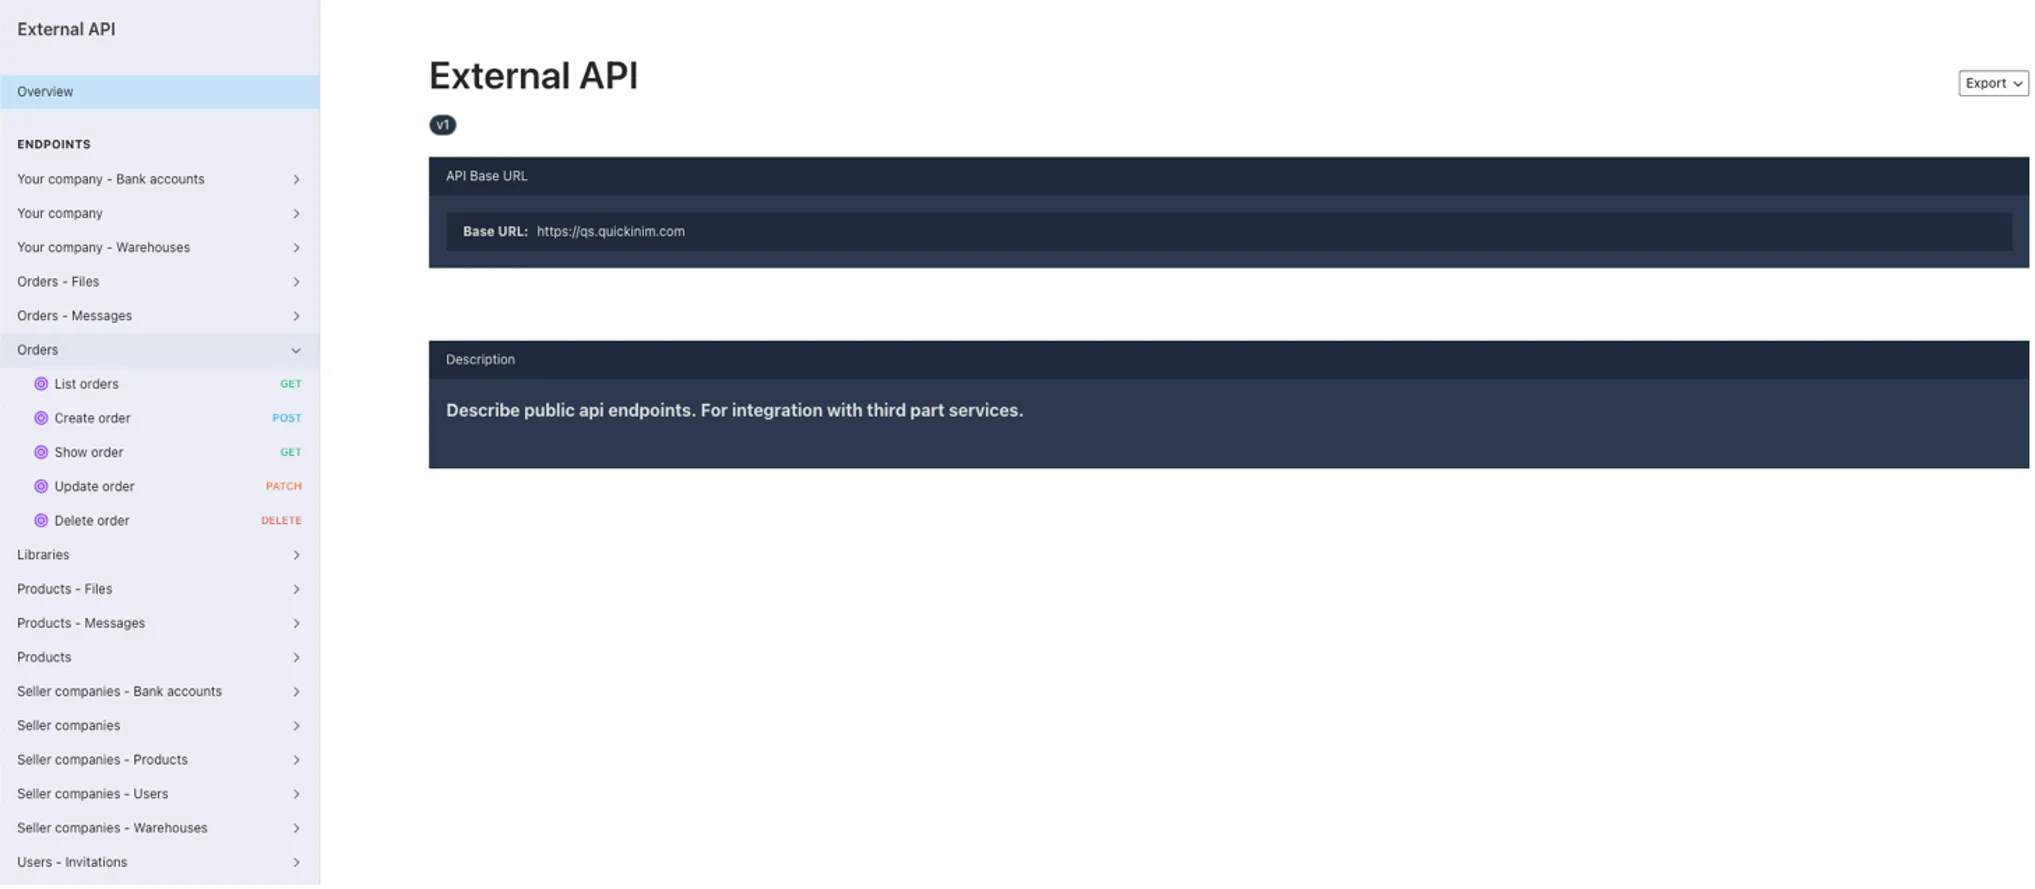
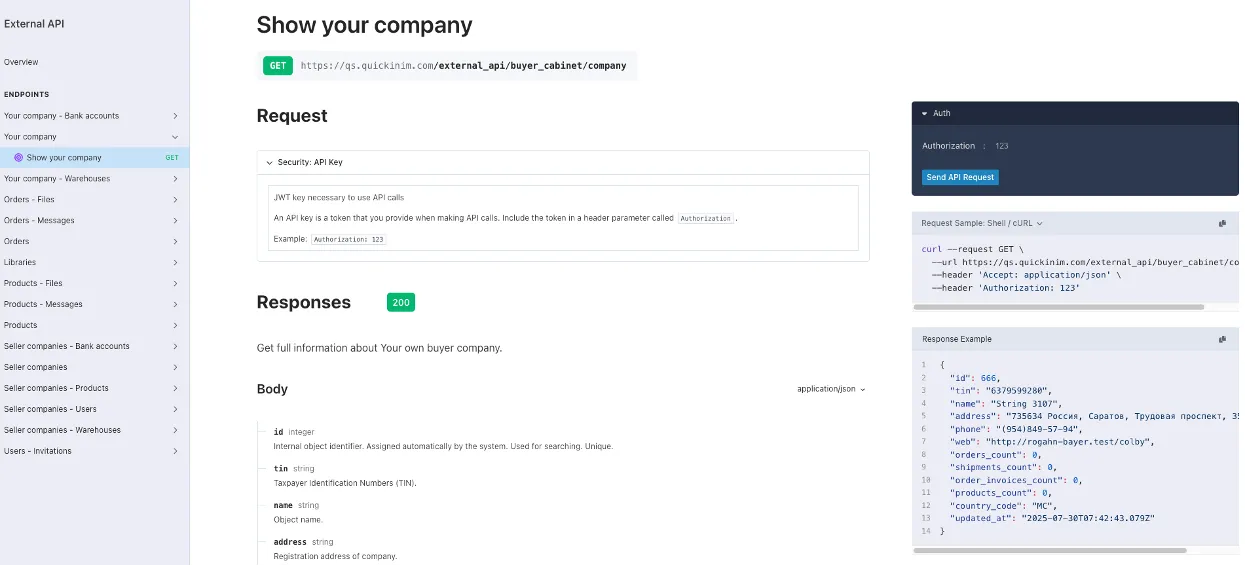
Integration
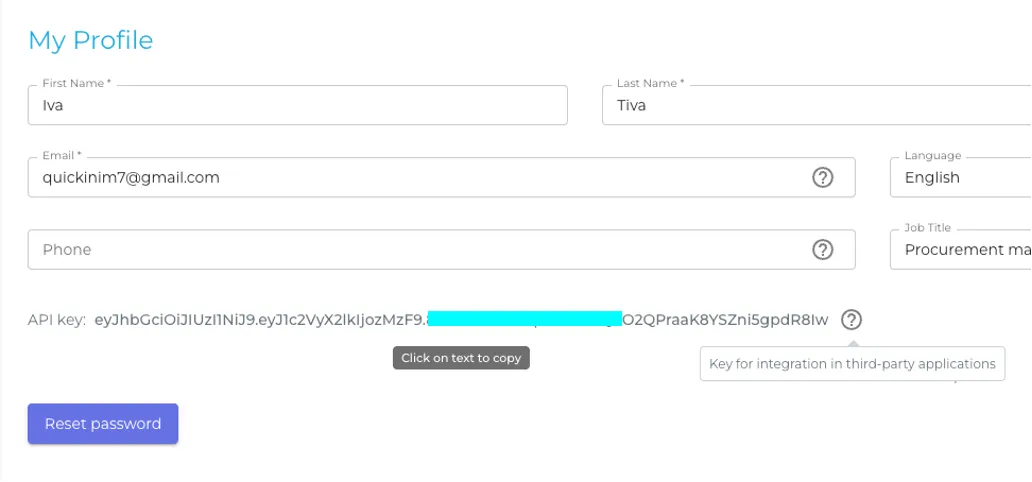
There is public documentation describing endpoint integration—a separate web page with a description of all external API methods (endpoints). A JWT key (API key) is used for authorization through third-party applications, which is available in Settings/My Profile. On the external API page, you can get a sample request in any selected language and a sample response from the QS system.
The Quickinim product allows you to generate files (JSON, XML formats) of key entities for import into other ERP systems, such as 1C ERP.
Quickinim acts as a consumer system—as a rule, ERP systems are closed to receiving information through integrations.
Example of use:
- In Quickinim, orders from 1C are created via API using a specially designed button: when loading, the Description field is placed in 1C in the BP Characteristics field, and the Characteristics field is intentionally left blank so that the user can correct it themselves, but all field mapping is configured by the 1C programmer. The integration connection between the systems is configured via the user ID and the Quickinim integration token—this combination is configured and transmitted via the API.
When sending from 1C to Quickinim, a new supplier with all fields and a new advisory order are created. - The second option is to export the order from 1C to JSON format and import it into Quickinim.
API Documentation:
For detailed API documentation, visit: https://qs.quickinim.com/docs
Data integrity
Entities from Quickinim are not deleted if there are dependencies. Suppliers have goods and orders. Orders have packing lists – the system checks the connections of the objects being deleted and does not allow deletion if there are connections.